Inquire: Call 0086-755-23203480, or reach out via the form below/your sales contact to discuss our design, manufacturing, and assembly capabilities.
Quote: Email your PCB files to Sales@pcbsync.com (Preferred for large files) or submit online. We will contact you promptly. Please ensure your email is correct.
Notes: For PCB fabrication, we require PCB design file in Gerber RS-274X format (most preferred), *.PCB/DDB (Protel, inform your program version) format or *.BRD (Eagle) format. For PCB assembly, we require PCB design file in above mentioned format, drilling file and BOM. Click to download BOM template To avoid file missing, please include all files into one folder and compress it into .zip or .rar format.
Designing a WiFi PCB antenna that performs well across both 2.4 GHz and 5 GHz bands is one of the trickier challenges in RF engineering. I’ve worked on dozens of WiFi-enabled products over the years, and the antenna is almost always where things go wrong first. The good news is that once you understand the fundamentals and have reliable dimension tables to work from, WiFi PCB antenna design becomes much more predictable.
This guide covers everything you need to design working single-band and dual-band WiFi PCB antennas: antenna type selection, actual dimensions you can use, ground plane requirements, impedance matching techniques, and the layout mistakes that consistently kill wireless performance. Whether you’re building an ESP32 project, a commercial IoT device, or a WiFi router, these principles apply.
A WiFi PCB antenna is an antenna structure etched directly onto a printed circuit board, designed to operate in the WiFi frequency bands. Unlike external antennas or chip antennas, a PCB antenna is simply a copper trace pattern that becomes part of your board—no additional components required for basic operation.
WiFi operates in several frequency bands:
WiFi Standard
Frequency Band
Bandwidth
WiFi 4 (802.11n)
2.4 GHz, 5 GHz
20/40 MHz
WiFi 5 (802.11ac)
5 GHz only
Up to 160 MHz
WiFi 6 (802.11ax)
2.4 GHz, 5 GHz
Up to 160 MHz
WiFi 6E (802.11ax)
2.4 GHz, 5 GHz, 6 GHz
Up to 160 MHz
For most IoT and embedded applications, you’ll be designing for the 2.4 GHz band alone or for dual-band 2.4/5 GHz operation. WiFi 6E’s 6 GHz band is still emerging and typically uses external antennas due to the additional design complexity.
PCB antennas make sense when you need low cost, high repeatability across production runs, and have sufficient board space. They’re the dominant choice for high-volume consumer IoT products where every cent matters.
Single-Band vs Dual-Band WiFi PCB Antenna Design
Before diving into specific designs, you need to decide whether your application requires single-band or dual-band coverage.
When to Use Single-Band (2.4 GHz Only)
Single-band 2.4 GHz designs are appropriate when:
Maximum range is the priority (2.4 GHz penetrates walls better)
Device is Bluetooth/BLE only (shares 2.4 GHz band)
Cost and simplicity are critical
Board space is limited
Legacy device compatibility is required
Typical applications: Smart home sensors, BLE beacons, Zigbee devices, simple IoT sensors, garage door openers.
Several antenna topologies work well for WiFi applications. Each has distinct tradeoffs in size, bandwidth, and ease of implementation.
Inverted-F Antenna (IFA) for WiFi
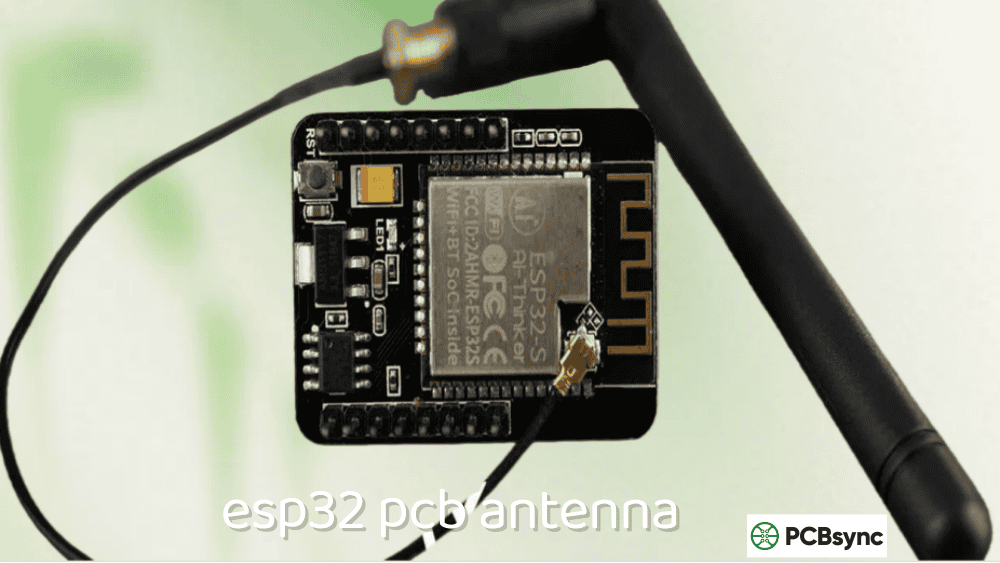
The Inverted-F Antenna is the workhorse of WiFi PCB antenna design. You’ll find it on nearly every ESP32 module and countless commercial WiFi products.
Key characteristics:
Compact footprint (typically 4–6 mm × 15–25 mm)
Inherently matched to 50Ω (often no external components needed)
Good omnidirectional radiation pattern
Moderate bandwidth (~200 MHz at 2.4 GHz)
Easy to integrate at PCB edge or corner
The IFA works by using a shorting pin to ground that allows impedance matching without external components. The feed point location along the radiating element determines the input impedance.
Meandered Inverted-F Antenna (MIFA) for WiFi
The MIFA compresses an IFA into a smaller footprint by folding the radiating element back and forth. This is exactly what ESP8266 and ESP32 modules use.
Key characteristics:
Very compact (as small as 3 mm × 12 mm)
Slightly lower efficiency than straight IFA
Narrower bandwidth (requires more careful tuning)
More sensitive to ground plane size
Popular for space-constrained designs
Planar Inverted-F Antenna (PIFA) for WiFi
The PIFA uses a planar patch element instead of a wire trace, offering wider bandwidth at the cost of larger size.
Key characteristics:
Wider bandwidth than IFA (good for dual-band)
Lower profile possible
Larger footprint (8–15 mm × 15–25 mm)
Better for dual-band and multi-band designs
Common in smartphones and tablets
Dual-Band Antenna Structures
For dual-band WiFi, you have several options:
Approach
Complexity
Size
Performance
Single dual-band antenna
High
Medium
Compromised both bands
Two separate antennas
Low
Large
Optimal each band
PIFA with parasitic elements
High
Medium
Good both bands
Meandered dual-band IFA
Medium
Medium
Acceptable both bands
For most applications, I recommend starting with a single dual-band antenna design. If performance is insufficient, move to separate antennas.
WiFi PCB Antenna Type Selection Guide
Application
Recommended Type
Reason
IoT sensor (2.4 GHz only)
MIFA
Smallest footprint
ESP32/ESP8266 custom board
IFA or MIFA
Proven designs available
WiFi router
PIFA or external
Maximum performance
Dual-band IoT gateway
Dual-band PIFA
Bandwidth for both bands
Wearable device
Chip antenna
Smallest overall size
USB dongle
IFA
Fits form factor
WiFi PCB Antenna Dimensions
Getting the dimensions right is critical. These tables provide starting points for common configurations on 1.6mm FR4 substrate.
2.4 GHz Band Antenna Dimensions
The 2.4 GHz ISM band spans 2.400–2.4835 GHz. Quarter-wavelength in free space is approximately 31 mm, but on FR4 substrate (εr ≈ 4.4), effective lengths are shorter.
IFA Dimensions for 2.4 GHz (1.6mm FR4):
Parameter
Dimension
Tolerance
Radiating arm length
15.2–18.5 mm
±0.5 mm
Radiating arm width
0.8–1.2 mm
±0.1 mm
Feed arm length
2.5–4.0 mm
±0.3 mm
Feed arm width
0.5–1.0 mm
±0.1 mm
Shorting arm length
4.0–6.0 mm
±0.3 mm
Shorting arm width
0.5–1.0 mm
±0.1 mm
Ground clearance
0.5–1.0 mm
±0.1 mm
Keep-out zone
15 × 6 mm minimum
—
MIFA Dimensions for 2.4 GHz (1.6mm FR4):
Parameter
Dimension
Notes
Overall footprint
3–5 mm × 12–18 mm
Varies with meander count
Trace width
0.5–1.0 mm
Consistent throughout
Meander spacing
0.5–1.0 mm
Affects coupling
Number of meanders
3–6
More = smaller antenna
Total trace length
18–24 mm
Determines resonance
5 GHz Band Antenna Dimensions
The 5 GHz band spans multiple sub-bands (5.15–5.35 GHz, 5.47–5.725 GHz, 5.725–5.875 GHz). The wide frequency range makes broadband design challenging.
Dual-band designs typically use a combined structure where different sections resonate at different frequencies.
Dual-Band IFA/PIFA Dimensions (1.6mm FR4):
Parameter
2.4 GHz Section
5 GHz Section
Radiating element length
15–18 mm
7–10 mm
Element width
1.0–2.0 mm
0.5–1.5 mm
Feed point position
3–4 mm from short
1.5–2.5 mm from short
Total antenna footprint
20–35 mm × 6–10 mm
(included)
Ground clearance
5–8 mm
(shared)
Ground Plane Requirements for WiFi PCB Antennas
The ground plane is half your antenna system. I’ve seen more WiFi antenna failures from inadequate ground planes than from anything else.
Minimum Ground Plane Dimensions
Device Type
Minimum Size
Recommended Size
Notes
USB dongle
15 × 25 mm
18 × 35 mm
USB ground extends system
IoT sensor
20 × 30 mm
25 × 40 mm
Affects both bands
Wearable
15 × 20 mm
18 × 30 mm
Body loading adds capacitance
WiFi gateway
30 × 40 mm
40 × 60 mm
Better for dual-band
Router/AP
40 × 60 mm
60 × 80 mm
Maximum performance
Critical Ground Plane Rules for WiFi Antennas
Rule 1: No copper under the antenna radiating element
This is the most common mistake. The entire antenna keep-out zone must be free of copper on ALL layers—no ground, no power planes, no signal traces.
Rule 2: Ground plane edge position matters
Surface currents flow along the ground plane edge nearest the antenna. This edge significantly affects impedance and radiation pattern. Keep it straight and clean—no notches, slots, or irregular shapes within 5mm of the antenna.
Rule 3: Solid ground on the layer below the feed
The layer immediately beneath the antenna feed region should have solid, uninterrupted ground. This provides the RF return path and defines transmission line impedance.
Rule 4: Via stitching along ground edges
Place ground vias along the perimeter of the ground plane near the antenna. For 2.4 GHz, spacing should be less than 6mm. For 5 GHz, keep spacing under 3mm to prevent slot radiation and ensure good RF continuity.
Rule 5: Consistent ground on internal layers
For 4-layer boards, ensure layers 2 and 3 have consistent ground in the antenna feed region. Avoid routing signals through this area on internal layers.
Ground Plane Size Effect on Performance
Ground Plane Size
2.4 GHz Impact
5 GHz Impact
Undersized (<20×30mm)
Frequency shifts up, reduced efficiency
Severe detuning possible
Minimum (20×30mm)
Acceptable performance
Marginal performance
Recommended (25×40mm)
Good performance
Good performance
Oversized (>40×60mm)
Diminishing returns
Slight improvement
Feed Line Design for 50Ω Impedance
The trace connecting your WiFi chip to the antenna must be designed for 50Ω characteristic impedance. Impedance mismatch here causes reflections and reduces transmitted power.
Microstrip Transmission Line Dimensions
For microstrip lines on FR4 (εr = 4.4) with ground on the adjacent layer:
Start with 0Ω resistors (shorts) in series positions and no-load (open) in shunt positions, then adjust based on VNA measurements.
Typical Matching Component Values
For 2.4 GHz single-band:
Tuning Goal
Series Element
Shunt Element
Shift frequency down
Series L: 1–3 nH
Shunt C: 0.5–2 pF
Shift frequency up
Series C: 0.5–2 pF
Remove shunt C
Improve match
Adjust series L: 0.5–4 nH
Adjust shunt C: 0.3–1.5 pF
For 5 GHz single-band:
Tuning Goal
Series Element
Shunt Element
Shift frequency down
Series L: 0.5–1.5 nH
Shunt C: 0.2–1.0 pF
Shift frequency up
Series C: 0.2–1.0 pF
Remove shunt C
Improve match
Adjust series L: 0.3–2 nH
Adjust shunt C: 0.1–0.8 pF
Dual-Band Matching Challenges
Dual-band matching is significantly more complex because component values that improve one band often degrade the other. Options include:
Compromise match: Accept sub-optimal return loss on both bands
Diplexer: Split bands with LC network, match separately
Wideband antenna: Design antenna for inherent wideband match
Active tuning: Use tunable components (expensive)
For most applications, a compromise match achieving -8 dB to -10 dB return loss on both bands is acceptable.
ESP32 and IoT Module Integration
Many WiFi projects use modules like ESP32, ESP8266, or similar. Understanding how to integrate with or design around their antennas is essential.
ESP32-WROOM/WROVER Module Placement
These modules have integrated PCB antennas. Critical placement rules:
Guideline
Requirement
Consequence if Violated
Module at board edge
Antenna must extend past main ground
Severe detuning
No ground under antenna
Keep-out extends 13mm from module edge
Acts as transmission line
Minimum ground size
25 × 40mm recommended
Reduced range
Component clearance
10mm from antenna section
Pattern distortion
Custom ESP32 Designs (Bare Chip)
When using the ESP32 chip directly (not module), you must design your own antenna or add an external antenna connector. Copy Espressif’s reference designs exactly, including:
Antenna geometry and dimensions
Ground plane size and shape
Matching network values
Layer stackup
Other Common WiFi Modules
Module
Antenna Type
External Antenna Option
ESP32-WROOM
Integrated MIFA
No
ESP32-WROVER
Integrated MIFA
Yes (U.FL)
ESP8266-12F
Integrated MIFA
No
nRF7002
External required
Yes
RTL8720DN
Integrated
Yes (some variants)
Testing Your WiFi PCB Antenna
Proper testing separates working designs from problematic ones. Here’s what to measure and what values to target.
S11 (Return Loss) Requirements
S11 Value
Return Loss
Power Reflected
Assessment
-6 dB
6 dB
25%
Marginal—needs tuning
-10 dB
10 dB
10%
Acceptable for production
-15 dB
15 dB
3%
Good performance
-20 dB
20 dB
1%
Excellent (often overkill)
Target: S11 ≤ -10 dB across all operating frequencies.
Bandwidth Requirements by WiFi Standard
WiFi Band
Frequency Range
Required S11 ≤ -10 dB
2.4 GHz (full)
2.400–2.4835 GHz
83.5 MHz minimum
5 GHz UNII-1
5.150–5.250 GHz
100 MHz
5 GHz UNII-2A
5.250–5.350 GHz
100 MHz
5 GHz UNII-2C
5.470–5.725 GHz
255 MHz
5 GHz UNII-3
5.725–5.850 GHz
125 MHz
5 GHz (full)
5.150–5.850 GHz
700 MHz (challenging)
Using a VNA for WiFi Antenna Testing
Calibrate carefully at the measurement plane (antenna feed point)
Measure S11 from 2.0–6.5 GHz to see full response
Check resonant frequencies (dips in S11)
Verify bandwidth meets requirements for each band
Test with enclosure in place—plastic shifts frequency down
Test multiple orientations and hand proximity effects
Range Testing
After S11 verification, perform practical range tests:
Set up two devices with known TX power
Measure RSSI at various distances
Compare against link budget calculations
Test through walls/obstacles
Test in multiple orientations
Common WiFi PCB Antenna Design Mistakes
These are the errors I see repeatedly in WiFi antenna designs.
Mistake 1: Ground Plane Under Antenna
Problem: Copper pour extends under the antenna radiating element.
Result: Antenna becomes a transmission line, not a radiator. Severe frequency shift and reduced efficiency.
Fix: Create explicit keep-out regions on ALL layers. Add silkscreen note for manufacturing.
Mistake 2: Insufficient Ground Plane Size
Problem: Ground plane too small or has large cutouts nearby.
Result: Unpredictable radiation pattern, poor efficiency, difficult to tune.
Fix: Maintain at least 25 × 40mm of continuous ground. Fill unused areas with ground.
Mistake 3: Forgetting About 5 GHz When Designing Dual-Band
Problem: Antenna tuned for 2.4 GHz, 5 GHz performance assumed.
Result: 5 GHz band has poor return loss, severely reduced range.
Fix: Design and tune for 5 GHz first (more critical), then verify 2.4 GHz.
Mistake 4: Ignoring Enclosure Effects
Problem: Antenna tuned on bare PCB, then enclosed in plastic housing.
Result: Resonant frequency shifts down 50–150 MHz, especially on 2.4 GHz.
Fix: Always perform final tuning with production enclosure in place.
Mistake 5: Components in Keep-Out Zone
Problem: Capacitors, crystals, or connectors placed near antenna.
Texas Instruments application notes include downloadable Gerbers
Silicon Labs reference designs available on GitHub
Espressif provides reference designs for ESP32 variants
Nordic Semiconductor reference designs for nRF52/nRF53
Frequently Asked Questions
Can I design a single WiFi PCB antenna that covers both 2.4 GHz and 5 GHz bands?
Yes, dual-band PCB antennas are common, but they require careful design. The typical approach uses a PIFA or modified IFA structure where different sections of the antenna resonate at different frequencies. Expect the antenna footprint to be larger than a single-band design (typically 25–35mm length), and matching becomes more complex. For critical applications, separate antennas for each band may provide better performance.
How much does plastic enclosure affect WiFi PCB antenna performance?
Plastic enclosures typically shift the resonant frequency down by 50–150 MHz at 2.4 GHz due to the increased effective dielectric constant around the antenna. The shift at 5 GHz can be proportionally larger in absolute terms. Always perform final antenna tuning with the production enclosure in place. You may need to shorten the antenna element by 1–3mm or adjust matching component values to compensate.
What’s the minimum ground plane size for a dual-band WiFi PCB antenna?
For acceptable dual-band performance, maintain at least 25 × 40mm of continuous ground plane. The 5 GHz band is more sensitive to ground plane size than 2.4 GHz. Smaller ground planes (down to 20 × 30mm) can work but will have reduced efficiency and more sensitivity to nearby objects. For optimal performance, especially in commercial products, target 30 × 50mm or larger.
Should I use a PCB antenna or chip antenna for my WiFi design?
PCB antennas are better when you have sufficient board space (15 × 25mm minimum), need lowest cost at volume, want maximum design control, and require consistent performance across production. Chip antennas are better when board space is extremely limited, you want a pre-certified solution, design resources are limited, or you’re prototyping and want known-good performance quickly. Both can achieve similar RF performance when properly implemented.
How do I know if my WiFi antenna needs a matching network?
Measure S11 with a VNA. If return loss is worse than -10 dB anywhere in your operating band, you need matching. Even with a good initial match, include footprints for a Pi matching network in your design. Manufacturing variations, enclosure effects, hand loading, and component tolerance can all detune the antenna. Having matching component positions available lets you adjust without a board respin—a critical consideration for production designs.
Conclusion
Designing a reliable WiFi PCB antenna requires attention to fundamentals: correct dimensions for your frequency bands, adequate ground plane, proper impedance matching, and testing in real-world conditions. The complexity increases significantly when moving from single-band 2.4 GHz designs to dual-band 2.4/5 GHz systems.
My recommendation for anyone starting out: don’t try to innovate on antenna geometry. Find a reference design from a reputable source (TI, Silicon Labs, Espressif, Infineon) that matches your board size and requirements, then copy it exactly. Get that working first, understand why it works, and only then start optimizing for your specific needs.
For production designs, always include matching network footprints and test with your actual enclosure. The cost of three 0402 component positions is negligible compared to a board respin because your antenna doesn’t work in the final product.
WiFi PCB antenna design combines science, engineering, and a bit of art. But with the right reference designs, proper layout techniques, and careful testing, you can achieve reliable wireless performance in your products.
Inquire: Call 0086-755-23203480, or reach out via the form below/your sales contact to discuss our design, manufacturing, and assembly capabilities.
Quote: Email your PCB files to Sales@pcbsync.com (Preferred for large files) or submit online. We will contact you promptly. Please ensure your email is correct.
Notes: For PCB fabrication, we require PCB design file in Gerber RS-274X format (most preferred), *.PCB/DDB (Protel, inform your program version) format or *.BRD (Eagle) format. For PCB assembly, we require PCB design file in above mentioned format, drilling file and BOM. Click to download BOM template To avoid file missing, please include all files into one folder and compress it into .zip or .rar format.


