Inquire: Call 0086-755-23203480, or reach out via the form below/your sales contact to discuss our design, manufacturing, and assembly capabilities.
Quote: Email your PCB files to Sales@pcbsync.com (Preferred for large files) or submit online. We will contact you promptly. Please ensure your email is correct.
Notes: For PCB fabrication, we require PCB design file in Gerber RS-274X format (most preferred), *.PCB/DDB (Protel, inform your program version) format or *.BRD (Eagle) format. For PCB assembly, we require PCB design file in above mentioned format, drilling file and BOM. Click to download BOM template To avoid file missing, please include all files into one folder and compress it into .zip or .rar format.
The operational amplifier—or op-amp—is arguably the most versatile component in analog electronics. If you’ve worked on any circuit involving signal amplification, filtering, or conditioning, you’ve likely encountered these remarkable devices. This operational amplifier guide covers everything beginners need to understand these fundamental building blocks.
Having designed countless circuits with op-amps over the years, I can tell you that mastering op amp basics opens doors to an enormous range of applications. From simple voltage followers to precision instrumentation amplifiers, the same fundamental principles apply. This op-amp tutorial will build your understanding from the ground up.
An operational amplifier is a high-gain, direct-coupled voltage amplifier with differential inputs and typically a single-ended output. The name “operational” comes from its original use in analog computers, where it performed mathematical operations like addition, subtraction, integration, and differentiation.
In practical terms, an op-amp is an integrated circuit (IC) that takes the difference between two input voltages, multiplies that difference by a very large gain factor (typically 100,000 or more), and produces an output voltage. This sounds simple, but this basic functionality enables an incredible variety of circuit functions.
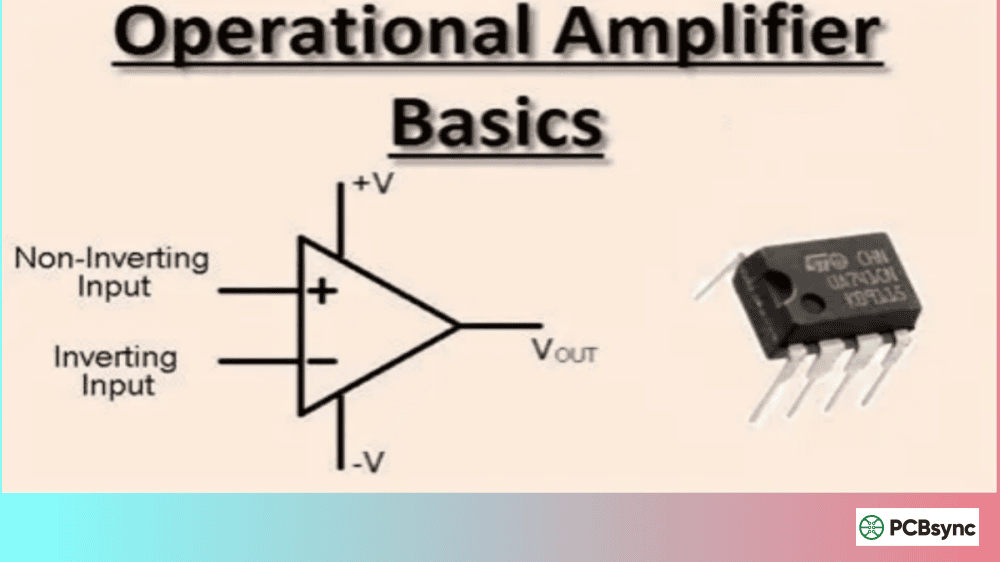
The Op-Amp Symbol and Terminals
Every op-amp has at least five terminals:
Terminal
Symbol
Function
Inverting Input
–
Input that produces inverted output
Non-Inverting Input
+
Input that produces non-inverted output
Output
Vout
Amplified output signal
Positive Supply
V+ or VCC
Positive power supply voltage
Negative Supply
V- or VEE
Negative supply voltage (or ground)
The triangle symbol represents the op-amp, with the two inputs on the left and output on the right. The power supply connections are often omitted from schematics for clarity, but they’re always required for the device to function.
Understanding Op-Amp Operation
The fundamental operation of an op-amp can be expressed by a simple equation:
Vout = A × (V+ – V-)
Where:
Vout = Output voltage
A = Open-loop gain (typically 100,000 to 1,000,000)
V+ = Voltage at non-inverting input
V- = Voltage at inverting input
This equation reveals the core op amp basics: the op-amp amplifies the difference between its two inputs. With such enormous gain, even a tiny difference (microvolts) between the inputs would drive the output to its maximum or minimum limits (called saturation or “rails”).
The Role of Feedback
Without feedback, an op-amp is essentially useless as a linear amplifier—it would immediately saturate with any input. The key to practical op-amp circuits is negative feedback, where a portion of the output signal is fed back to the inverting input.
Negative feedback creates a self-correcting system. If the output tries to go too high, the feedback increases the inverting input voltage, which reduces the output. If the output tries to go too low, the opposite happens. This continuous correction stabilizes the circuit and creates predictable, controllable behavior.
The Two Golden Rules
When analyzing op-amp circuits with negative feedback, two simplifying assumptions (often called the “golden rules”) make calculations straightforward:
Rule 1: No current flows into the input terminals Because input impedance is extremely high (megaohms to gigaohms), we assume the inputs draw zero current.
Rule 2: The two input terminals are at the same voltage With negative feedback, the op-amp adjusts its output to keep the voltage difference between inputs at essentially zero (called a “virtual short”).
These rules aren’t perfectly true for real op-amps, but they’re accurate enough for most circuit analysis and design work.
Ideal vs. Real Op-Amp Characteristics
Understanding the difference between ideal and real op-amp behavior is essential for this operational amplifier guide.
Ideal Op-Amp Characteristics
Parameter
Ideal Value
Open-Loop Gain (AOL)
Infinite
Input Impedance (Zin)
Infinite
Output Impedance (Zout)
Zero
Bandwidth
Infinite
Common Mode Rejection Ratio (CMRR)
Infinite
Slew Rate
Infinite
Input Offset Voltage
Zero
Input Bias Current
Zero
Real Op-Amp Characteristics (Example: LM741)
Parameter
Typical Value
Open-Loop Gain
200,000 (106 dB)
Input Impedance
2 MΩ
Output Impedance
75 Ω
Gain-Bandwidth Product
1 MHz
CMRR
90 dB
Slew Rate
0.5 V/µs
Input Offset Voltage
1 mV
Input Bias Current
80 nA
Real op-amps deviate from ideal behavior, but for many applications, these deviations are negligible. Understanding when they matter is part of mastering op amp basics.
Key Op-Amp Specifications Explained
This section of our op-amp tutorial covers the specifications you’ll find on datasheets and what they mean for your circuits.
Open-Loop Gain (AOL)
Open-loop gain is the amplification factor without any feedback. While op-amps have enormous open-loop gains (100,000+), you almost never use them this way. With feedback, the closed-loop gain is determined by external resistors, making it predictable and stable regardless of variations in open-loop gain.
Input Impedance
Input impedance determines how much the op-amp loads the signal source. Higher is better—you don’t want the op-amp drawing current from the signal source, which would alter the voltage you’re trying to measure or amplify. General-purpose op-amps have input impedances of 1-10 MΩ, while FET-input types can exceed 1 TΩ (1,000,000 MΩ).
Output Impedance
Output impedance affects the op-amp’s ability to drive loads. Lower is better. However, with negative feedback, the effective output impedance drops dramatically—a closed-loop op-amp circuit typically presents less than 1Ω to the load.
Gain-Bandwidth Product (GBW)
The gain-bandwidth product is constant for a given op-amp. If the GBW is 1 MHz:
At gain = 1, bandwidth = 1 MHz
At gain = 10, bandwidth = 100 kHz
At gain = 100, bandwidth = 10 kHz
This trade-off between gain and bandwidth is fundamental to op-amp design. High-frequency applications require op-amps with higher GBW products.
Common Mode Rejection Ratio (CMRR)
CMRR measures how well the op-amp rejects signals that appear simultaneously on both inputs. Ideally, an op-amp should only respond to the difference between inputs—any signal common to both should be rejected. High CMRR (typically 70-120 dB) is essential for differential measurements in noisy environments.
Slew Rate
Slew rate is the maximum rate at which the output voltage can change, measured in volts per microsecond (V/µs). This specification limits high-frequency, large-signal performance. The LM741’s 0.5 V/µs slew rate means a 10V output swing requires at least 20 µs—limiting it to roughly 15 kHz for full-amplitude sinusoidal signals. High-speed op-amps can achieve slew rates exceeding 1000 V/µs.
Input Offset Voltage
In an ideal op-amp, when both inputs are at the same voltage, the output would be zero. Real op-amps exhibit a small offset—typically 1-10 mV for general-purpose types, down to microvolts for precision op-amps. This offset can be significant in high-gain or DC applications.
Input Bias Current
Real op-amp inputs require small currents to bias internal transistors. Bipolar-input op-amps might require 80-500 nA, while FET-input types can be below 1 pA. Bias current flowing through source impedances creates voltage errors, particularly problematic in high-impedance circuits.
Popular Op-Amp ICs
This operational amplifier guide would be incomplete without covering the most commonly used devices.
Classic General-Purpose Op-Amps
Part Number
Description
Supply Voltage
GBW
Slew Rate
LM741
Industry standard
±5V to ±18V
1 MHz
0.5 V/µs
LM358
Dual, single supply
3V to 32V
1 MHz
0.5 V/µs
LM324
Quad, single supply
3V to 32V
1 MHz
0.5 V/µs
TL071/TL072
JFET input
±5V to ±18V
3 MHz
13 V/µs
TL081/TL082
JFET input
±5V to ±18V
3 MHz
13 V/µs
Precision Op-Amps
Part Number
Description
Offset Voltage
Applications
OP07
Low offset
75 µV
Instrumentation
OPA277
Precision
10 µV
Data acquisition
LTC1050
Zero-drift
1 µV
Precision DC
High-Speed Op-Amps
Part Number
Description
GBW
Slew Rate
LM318
Fast, compensated
15 MHz
70 V/µs
OPA656
Wideband
230 MHz
290 V/µs
AD8065
High speed
145 MHz
180 V/µs
Rail-to-Rail Op-Amps
Part Number
Description
Supply
Key Feature
LMV358
Dual, R-R output
2.7-5.5V
Rail-to-rail output
MCP6002
Dual, R-R I/O
1.8-6V
Full rail-to-rail
OPA344
Single supply
2.5-5.5V
Rail-to-rail I/O
Basic Op-Amp Circuit Configurations
Understanding these fundamental configurations is the core of any op-amp tutorial.
Inverting Amplifier
The inverting amplifier is one of the most common op-amp configurations. The input signal connects through an input resistor (Rin) to the inverting input, while the non-inverting input connects to ground. A feedback resistor (Rf) connects the output to the inverting input.
Gain Formula: Av = -Rf / Rin
The negative sign indicates phase inversion—a positive input produces a negative output and vice versa.
Example: With Rin = 10kΩ and Rf = 100kΩ, gain = -100kΩ/10kΩ = -10
The inverting input is held at “virtual ground” (0V) because of negative feedback, making analysis straightforward.
Non-Inverting Amplifier
In the non-inverting configuration, the input signal connects directly to the non-inverting input. A voltage divider formed by Rf and R1 connects from output to ground, with the junction connected to the inverting input.
Gain Formula: Av = 1 + (Rf / R1)
The output maintains the same polarity as the input. Note that gain is always at least 1—you cannot achieve gains less than unity with this configuration.
Example: With R1 = 10kΩ and Rf = 90kΩ, gain = 1 + 90kΩ/10kΩ = 10
Voltage Follower (Buffer)
The voltage follower is the simplest op-amp circuit—the output connects directly to the inverting input with no other components. The output exactly follows the input (gain = 1).
Why use it? The voltage follower provides impedance transformation. It presents extremely high impedance to the source (drawing virtually no current) while providing low impedance to the load (able to source significant current). This “buffers” sensitive signal sources from loading effects.
Summing Amplifier
The summing amplifier adds multiple input voltages. Multiple input resistors connect different signals to the inverting input, and the output is proportional to the sum (inverted) of all inputs.
If all input resistors are equal, the output is simply the inverted sum multiplied by the ratio Rf/R.
Differential Amplifier
The differential amplifier amplifies the difference between two input signals while rejecting any signal common to both inputs. This configuration uses four resistors in a specific arrangement.
Output Formula: Vout = (Rf/R1) × (V2 – V1)
This configuration is fundamental to instrumentation amplifiers and any application requiring rejection of common-mode noise.
Integrator
The integrator replaces the feedback resistor with a capacitor. The output is proportional to the integral of the input signal over time.
Output Formula: Vout = -(1/RC) × ∫Vin dt
Integrators are used in waveform generators (producing triangle waves from square waves), analog computers, and active filters.
Differentiator
The differentiator places the capacitor in the input path instead of feedback. The output is proportional to the rate of change of the input signal.
Output Formula: Vout = -RC × (dVin/dt)
Differentiators are useful for detecting edges and rate-of-change, though they’re noise-sensitive and often require additional compensation.
Op-Amp as Comparator
Although dedicated comparator ICs exist, op-amps can function as comparators in open-loop configuration. Without feedback, the enormous gain causes the output to saturate at either supply rail based on which input has higher voltage.
Operation:
If V+ > V-, output goes to positive saturation (+Vsat)
If V+ < V-, output goes to negative saturation (-Vsat)
Applications include:
Zero-crossing detectors
Level detection circuits
Simple threshold comparators
Pulse generation
Note: Dedicated comparators (like LM339 or LM311) are optimized for this application with faster response and open-collector outputs. Using a standard op-amp as a comparator works but may have slower switching and can suffer from oscillation at the switching point.
The History of the Op-Amp
Understanding where op-amps came from helps appreciate their significance in this operational amplifier guide.
The first operational amplifier was developed using vacuum tubes in the 1940s, primarily for use in analog computers that performed mathematical operations—hence the name “operational.” These early devices were bulky, power-hungry, and expensive.
The transistor revolution led to solid-state op-amps in the 1960s. Texas Instruments introduced the µA709 in 1965, one of the first widely used IC op-amps. However, it required external compensation and was prone to damage.
In 1968, Fairchild Semiconductor released the µA741, designed by Dave Fullagar. The 741 included internal compensation and protection circuitry, making it far more user-friendly. It became the industry standard and is still manufactured today, over 55 years later. While modern op-amps have far superior specifications, the 741’s simplicity and robustness make it excellent for learning.
Since then, op-amp technology has advanced dramatically. Modern devices offer rail-to-rail operation, micropower consumption, GHz bandwidths, and precision measured in microvolts—all at prices that would have seemed impossible just decades ago.
Understanding Op-Amp Limitations
Every op-amp tutorial should address real-world limitations. Knowing what can go wrong helps you design reliable circuits.
Output Current Limitations
Op-amps can only source or sink limited current, typically 20-40mA for general-purpose devices. Exceeding this limit doesn’t necessarily damage the op-amp, but the output voltage will drop or the internal protection circuitry will activate. For higher current loads, use a buffer transistor or choose a high-current op-amp.
Input Voltage Limits
Most op-amps cannot tolerate input voltages beyond the power supply rails. Some devices (like the LM358) have inputs that can handle signals down to the negative rail. Others have restricted common-mode input ranges. Always check the datasheet’s “Absolute Maximum Ratings” section.
Temperature Effects
Op-amp specifications change with temperature. Input offset voltage drifts (typically 1-20 µV/°C), bias currents increase, and gain-bandwidth product decreases at elevated temperatures. For precision applications in varying temperature environments, choose op-amps specified for your temperature range and with low temperature coefficients.
Noise Considerations
All op-amps generate internal noise that adds to the signal. For low-level signals, this noise can become significant. Op-amps specify voltage noise density (nV/√Hz) and current noise density (pA/√Hz). Low-noise op-amps are specifically designed to minimize these contributions. Source impedance affects how current noise translates to voltage noise—high-impedance sources benefit from FET-input op-amps with low current noise.
Understanding power supply requirements is essential op amp basics knowledge.
Dual (Split) Supply Operation
Traditional op-amp circuits use dual supplies (e.g., +15V and -15V). This allows the output to swing both positive and negative relative to ground, making it straightforward to process AC signals centered around 0V.
Single Supply Operation
Many modern op-amps (LM358, LM324, rail-to-rail types) operate from single supplies. In single-supply operation:
Ground becomes the negative rail
A bias voltage (often Vcc/2) provides the reference point
Input and output signals are offset from ground
Rail-to-Rail Operation
Standard op-amps cannot swing their output all the way to the supply rails—they typically saturate 1-2V away. Rail-to-rail op-amps can swing output very close to both rails, maximizing usable signal range in low-voltage applications.
Practical Design Tips
From years of working with op-amps, here are essential practical considerations:
Bypass Capacitors
Always place 0.1 µF ceramic bypass capacitors directly at the power pins of each op-amp IC. This filters high-frequency noise and prevents oscillation. For sensitive circuits, add a 10 µF electrolytic in parallel.
Input Protection
Op-amp inputs have limited voltage range, typically a few volts beyond the supply rails. Exceeding this can damage the device. For circuits with potentially large input voltages, add protection diodes to clamp the input to safe levels.
Stability
Op-amp circuits can oscillate if not properly designed. Causes include:
Capacitive loads on the output
Long feedback paths picking up noise
Inadequate bypassing
Using non-unity-gain-stable op-amps at low gains
Solutions include output series resistors (10-100Ω) when driving capacitive loads, short feedback paths, and proper op-amp selection.
Offset Nulling
Many op-amps (like the 741) provide offset null pins for adjusting input offset voltage to zero. A potentiometer connected between these pins allows trimming. Modern precision op-amps often make this unnecessary.
Common Applications
Op-amps appear in virtually every analog electronics application:
Application
Configuration Used
Audio preamplifier
Non-inverting amplifier
Active filters
Multiple configurations
Voltage regulators
Error amplifier
Signal conditioning
Amplifiers, buffers
Instrumentation
Differential, instrumentation amps
Oscillators
With positive feedback
Comparators
Open-loop
Sample-and-hold
Buffer with switch
DAC output
Buffer, I-to-V converter
Sensor interfaces
Amplifier, filter
Audio Applications
Op-amps excel in audio circuits. A typical audio preamplifier uses a non-inverting configuration with gains of 10-100. The TL072 and NE5532 are popular choices due to their low noise characteristics. Active tone controls use op-amps configured as adjustable filters, allowing bass and treble adjustment. Headphone amplifiers often use op-amps in voltage follower or low-gain configurations to drive low-impedance headphones from line-level sources.
Signal Conditioning
When working with sensors, the raw signal often needs amplification, filtering, or level shifting before it can be processed by an ADC or microcontroller. Op-amp circuits handle all these tasks. A thermocouple output of millivolts can be amplified to a 0-5V range suitable for ADC input. A noisy sensor signal can be cleaned with an active low-pass filter. Level shifters convert bipolar signals to the single-ended range required by single-supply microcontrollers.
Active Filters
Passive filters using only resistors and capacitors have limitations—they cannot provide gain, and their characteristics are affected by load impedance. Active filters using op-amps overcome these limitations. Common active filter topologies include Sallen-Key, Multiple Feedback (MFB), and State Variable. These can implement low-pass, high-pass, band-pass, and notch filter responses with precise control over cutoff frequency and Q factor.
Instrumentation Amplifiers
While technically a separate device category, instrumentation amplifiers are built from op-amps. The classic three-op-amp instrumentation amplifier provides extremely high CMRR and precisely controllable gain. These are essential in applications like bridge sensor interfaces, medical instrumentation (ECG, EEG), and precision measurement systems where small differential signals must be amplified in the presence of large common-mode voltages.
Troubleshooting Op-Amp Circuits
When op-amp circuits don’t work as expected, systematic troubleshooting helps identify the problem.
Common Problems and Solutions
Problem
Possible Causes
Solutions
Output stuck at rail
Open feedback, wrong feedback polarity
Check feedback connection
Oscillation
Capacitive load, layout issues
Add output resistor, shorten traces
Distorted output
Slew rate limiting, saturation
Reduce frequency or amplitude
Offset error
Input bias current, offset voltage
Use precision op-amp, add compensation
Noise
Poor bypassing, ground loops
Add bypass caps, improve layout
No output
Power supply issue, damaged IC
Check power, replace IC
Systematic Troubleshooting Steps
Step 1: Verify Power Supply Check that both supply voltages are present at the IC pins. Measure directly at the IC, not just at the power supply. Verify that bypass capacitors are in place and functioning.
Step 2: Check DC Operating Point With no input signal, measure the DC voltage at each op-amp pin. The two inputs should be at nearly the same voltage. The output should be between the supply rails (not saturated).
Step 3: Apply Known Input Apply a known DC voltage or low-frequency sine wave. Verify the output responds appropriately for the circuit configuration and gain.
Step 4: Check Frequency Response If the circuit works at low frequencies but not higher ones, you may be exceeding the gain-bandwidth product or slew rate limitations.
Layout Considerations
PCB layout significantly affects op-amp circuit performance. Keep these guidelines in mind:
Place bypass capacitors as close to power pins as possible
Keep input and feedback traces short to minimize stray capacitance
Use ground plane for shielding in sensitive circuits
Separate analog and digital grounds, connecting at a single point
Route sensitive traces away from noisy digital signals
Resources and Downloads
Datasheets and Documentation
Resource
Description
Texas Instruments
Comprehensive op-amp datasheets and application notes
Analog Devices
Technical tutorials and design guides
ON Semiconductor
LM741, LM358 documentation
Microchip
MCP6xxx series datasheets
Learning Resources
Resource
Focus
Electronics-Tutorials.ws
Detailed op-amp theory
All About Circuits
Practical tutorials
Analog Devices Op-Amp Applications Handbook
Professional reference
TI Precision Labs (Videos)
In-depth video tutorials
Simulation Tools
Tool
Description
LTspice
Free, powerful analog simulation
TINA-TI
Texas Instruments free simulator
Multisim
Educational circuit simulation
Falstad
Browser-based simulation
Frequently Asked Questions
What is the difference between an op-amp and a comparator?
Both op-amps and comparators have similar internal structure—differential inputs and high gain. The difference lies in optimization. Op-amps are designed for linear operation with negative feedback, featuring internal compensation for stability and outputs optimized for continuous voltage levels. Comparators are optimized for switching between two states, with faster response times, no internal compensation (since they don’t use feedback), and outputs designed to interface with digital logic. While you can use an op-amp as a comparator, dedicated comparators perform better in switching applications.
Can I use a single power supply with any op-amp?
Not all op-amps are designed for single-supply operation. Traditional op-amps like the 741 require dual supplies because their input and output stages cannot operate near the negative rail (ground in single-supply systems). Op-amps specifically designed for single-supply operation (LM358, LM324, rail-to-rail types) have modified input stages that work down to ground. When using single-supply designs, remember that signals must be biased above ground—you can’t process signals that go negative.
Why does my op-amp circuit oscillate?
Oscillation typically results from insufficient phase margin—the feedback becomes positive at some frequency instead of negative. Common causes include: capacitive loads on the output (add a small series resistor), stray capacitance in the feedback path (keep feedback paths short), inadequate power supply bypassing (add 0.1µF capacitors at power pins), or using a non-compensated op-amp at too low a gain. Also check that your feedback is connected to the inverting input—connecting to the non-inverting input creates intentional positive feedback (an oscillator).
How do I choose between different op-amp types?
Start by identifying your application’s critical requirements. For audio or general-purpose applications, standard op-amps like TL072 or NE5532 work well. For high-impedance sources (like piezoelectric sensors), choose FET-input types for their low bias current. For precision DC measurements, select low-offset, low-drift precision op-amps. For high-frequency applications, prioritize gain-bandwidth product and slew rate. For battery-powered devices, consider low-power op-amps and single-supply capability. Cost matters for high-volume production, but for prototyping, focus on performance.
What does “rail-to-rail” actually mean?
Rail-to-rail refers to an op-amp’s ability to swing its input and/or output voltage very close to the power supply rails (V+ and V-). Standard op-amps typically can’t operate within 1-2 volts of the rails. “Rail-to-rail output” means the output can swing close to both rails (important for maximizing signal swing in low-voltage systems). “Rail-to-rail input” means the input common-mode range extends to the rails. “Rail-to-rail input/output” provides both capabilities. Note that “rail-to-rail” doesn’t mean exactly to the rails—there’s always a small voltage drop, typically 20-100mV under light loads.
Conclusion
The operational amplifier is one of electronics’ most powerful and versatile components. This operational amplifier guide has covered the fundamental concepts: how op-amps work, their key specifications, common circuit configurations, and practical design considerations.
Understanding op amp basics provides a foundation for countless applications. Whether you’re building a simple audio amplifier, designing precision instrumentation, or creating active filters, the principles remain the same. The op-amp’s behavior is almost entirely determined by external components and feedback configuration, making it predictable and versatile.
As you continue exploring op-amp circuits, remember the golden rules, understand when ideal assumptions break down, and always verify your designs with calculations and simulation before building. The op-amp tutorial concepts presented here will serve you well across all areas of analog electronics design.
Start with simple circuits—build an inverting amplifier, measure its gain, observe its frequency response. Progress to more complex configurations as your understanding grows. The op-amp has been a fundamental building block for over 50 years, and mastering it remains essential for any serious electronics work.
Inquire: Call 0086-755-23203480, or reach out via the form below/your sales contact to discuss our design, manufacturing, and assembly capabilities.
Quote: Email your PCB files to Sales@pcbsync.com (Preferred for large files) or submit online. We will contact you promptly. Please ensure your email is correct.
Notes: For PCB fabrication, we require PCB design file in Gerber RS-274X format (most preferred), *.PCB/DDB (Protel, inform your program version) format or *.BRD (Eagle) format. For PCB assembly, we require PCB design file in above mentioned format, drilling file and BOM. Click to download BOM template To avoid file missing, please include all files into one folder and compress it into .zip or .rar format.


