Inquire: Call 0086-755-23203480, or reach out via the form below/your sales contact to discuss our design, manufacturing, and assembly capabilities.
Quote: Email your PCB files to Sales@pcbsync.com (Preferred for large files) or submit online. We will contact you promptly. Please ensure your email is correct.
Notes: For PCB fabrication, we require PCB design file in Gerber RS-274X format (most preferred), *.PCB/DDB (Protel, inform your program version) format or *.BRD (Eagle) format. For PCB assembly, we require PCB design file in above mentioned format, drilling file and BOM. Click to download BOM template To avoid file missing, please include all files into one folder and compress it into .zip or .rar format.
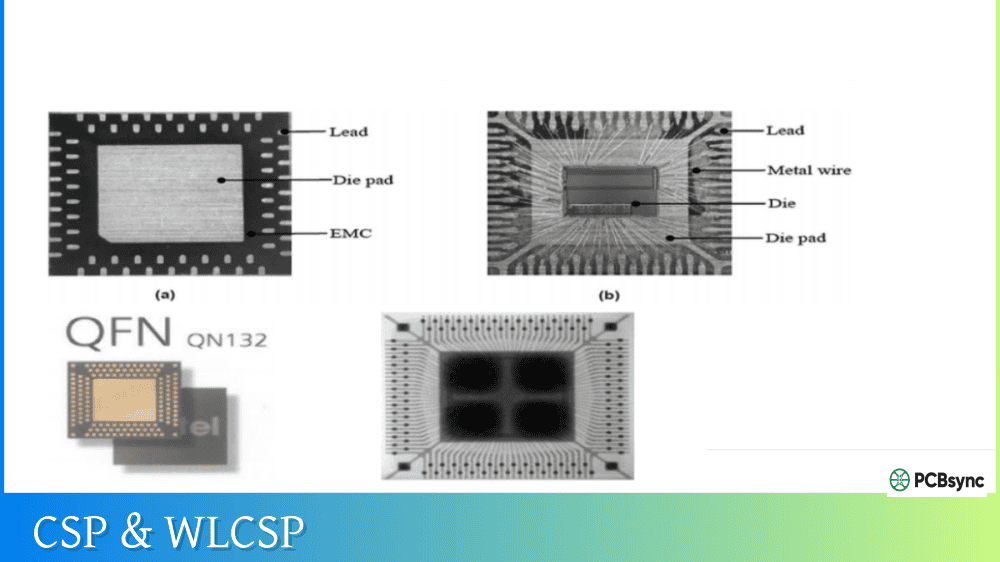
CSP & WLCSP: Chip Scale Packaging for Miniaturization
The smartphone in your pocket contains dozens of integrated circuits, yet it’s thinner than ever. The smartwatch on your wrist packs more computing power than computers that once filled entire rooms. How? A significant part of the answer lies in chip scale package technology—packaging that’s barely larger than the silicon die itself.
As a PCB engineer, I’ve watched CSP packages transform what’s possible in electronics design. Where we once struggled to fit basic functionality into handheld devices, we now integrate complex systems into spaces measured in millimeters. This guide explains everything you need to know about chip scale packaging and its most advanced variant, WLCSP, from a practical design perspective.
A chip scale package (CSP) is an integrated circuit package where the package area is no more than 1.2 times the area of the semiconductor die inside. This definition comes from the IPC/JEDEC J-STD-012 standard. The key requirement: it must be a single-die, direct surface-mountable package.
Originally, CSP stood for “chip-size package,” implying the package was exactly the size of the chip. Since few packages achieve true 1:1 ratio, the industry adopted “chip-scale package” to reflect the reality that most are slightly larger than the die.
To put this in perspective: a traditional QFP (Quad Flat Package) might have a silicon density of only 10-30%—meaning the package is 3-10 times larger than the actual chip. A CSP package achieves 60-100% silicon density, dramatically reducing the space your component occupies on the PCB.
The concept emerged in 1993, proposed by Junichi Kasai of Fujitsu and Gen Murakami of Hitachi Cable. Mitsubishi Electric demonstrated the first working concept shortly after. By the early 2000s, chip scale packaging had become mainstream, driven by the explosive growth of mobile devices.
How CSP Technology Works
The fundamental innovation in chip scale packaging is eliminating or minimizing the traditional packaging infrastructure—bulky lead frames, long bond wires, and oversized plastic bodies. Instead, CSPs use advanced interconnection methods to connect the die directly to external terminals.
Basic CSP Structure
A typical CSP package consists of:
Die (Silicon Chip): The semiconductor device itself, often thinned to 50-200 micrometers for ultra-low profile packaging.
Redistribution Layer (RDL): A thin metal wiring layer that reroutes I/O connections from the original bond pad locations on the die to an optimized array of external connection points. This is key to converting perimeter-pad designs into area-array configurations.
Under Bump Metallization (UBM): A metal stack that provides a solderable surface on the die or RDL, typically consisting of adhesion, barrier, and wetting layers.
Solder Bumps or Balls: Tiny solder spheres that serve as the external connections, allowing the package to be surface-mounted directly to a PCB.
Protective Coating/Encapsulation: An optional polymer layer or molding compound that protects the die and interconnects from environmental damage.
Types of Chip Scale Packages
The industry has developed over 50 different CSP configurations, each optimized for specific applications. Here are the major categories:
Wafer-Level CSP (WLCSP)
The most compact CSP variant, where all packaging processes occur while the die is still part of the wafer. No interposer or substrate is added—the finished package is literally the die with redistribution layers and solder balls. WLCSP achieves true chip-scale dimensions (1:1 ratio).
Best for: Smartphones, wearables, IoT sensors, power management ICs
Flip-Chip CSP (FCCSP)
Uses flip-chip technology where the die is inverted and mounted face-down on a thin organic substrate using solder bumps. The substrate provides redistribution and mechanical support.
Best for: Medium I/O count devices (up to ~200 I/Os), applications requiring better board-level reliability than WLCSP
Leadframe CSP (LFCSP)
A copper leadframe serves as the substrate, with the die wire-bonded to the frame. Despite using wire bonds, careful design keeps the package within CSP dimensions.
Best for: Cost-sensitive applications, lower I/O counts, better thermal performance
Tape-Based CSP (T-CSP)
Uses flexible polyimide tape as the interconnect substrate. The die is mounted on the tape, wire-bonded, and encapsulated. The tape’s flexibility provides stress relief during thermal cycling.
Best for: Applications requiring good thermal fatigue resistance
Rigid Substrate CSP
Uses a thin laminate or ceramic substrate for redistribution. More robust than WLCSP but slightly larger.
Best for: Higher I/O counts, applications requiring additional routing layers
CSP Package Type Comparison
Package Type
Size Ratio
Substrate
Die Attach
I/O Range
Relative Cost
WLCSP
1:1
None (die itself)
N/A
4-200
Low-Medium
FCCSP
1.1-1.2:1
Organic laminate
Flip-chip
50-500
Medium-High
LFCSP
1.1-1.2:1
Copper leadframe
Wire bond
8-100
Low
T-CSP
1.1-1.2:1
Polyimide tape
Wire bond
20-300
Medium
Rigid CSP
1.1-1.2:1
BT/ceramic
Various
50-500
Medium-High
Understanding WLCSP in Detail
Wafer-Level Chip Scale Package (WLCSP) deserves special attention because it represents the ultimate in miniaturization. The term “wafer-level” indicates that all packaging steps—redistribution, bump formation, and testing—happen while the chips are still together on the silicon wafer. Only after packaging is complete is the wafer diced into individual units.
WLCSP Construction
A typical WLCSP structure, from bottom to top:
Silicon die with original aluminum bond pads
First polymer layer (P1) providing passivation and stress relief
Copper redistribution layer (RDL) routing signals from perimeter pads to area-array configuration
Second polymer layer (P2) insulating the RDL except at bump locations
Under bump metallization (UBM) providing solderable surface
Solder balls (typically lead-free SAC alloy) for PCB connection
Optional backside laminate protecting the die back surface
WLCSP Advantages
Smallest possible footprint: The package is exactly the die size—nothing smaller exists short of bare die assembly.
Lowest inductance: No bond wires or long substrate traces. The signal path from die to PCB is minimal, making WLCSP excellent for RF and high-speed applications.
Best electrical performance: Short interconnects mean lower resistance, lower inductance, and better signal integrity.
Good thermal performance: Heat transfers efficiently from the die through the solder balls directly to the PCB.
Cost-effective at volume: Wafer-level processing is highly parallel—thousands of packages are processed simultaneously.
WLCSP Limitations
Board-level reliability concerns: Without underfill, WLCSP solder joints are vulnerable to thermal cycling and mechanical stress. The coefficient of thermal expansion (CTE) mismatch between silicon (2.6 ppm/°C) and FR-4 (~16 ppm/°C) stresses solder joints during temperature changes.
Limited I/O count: Practical WLCSP devices typically have fewer than 200 balls. Higher counts require impractically small ball pitches.
PCB complexity: Fine-pitch WLCSP (0.4mm or less) requires HDI PCB technology with microvias.
Handling sensitivity: The bare die backside is exposed and relatively fragile.
For programmable devices like Altera FPGA products, CSP options provide compact alternatives to larger BGA packages for space-constrained designs while maintaining the necessary I/O density.
PCB Design Guidelines for CSP Packages
Successfully implementing CSP devices requires attention to several critical design factors:
Land Pattern Design
Pad type selection: Choose between Solder Mask Defined (SMD) and Non-Solder Mask Defined (NSMD) pads:
NSMD provides better solder joint reliability for thermal cycling (recommended by most manufacturers)
SMD offers better drop test performance due to the solder mask mechanically anchoring the pad
Pad sizing: Typically, pad diameter should match the solder ball diameter within ±5%. Consult the component datasheet for specific recommendations.
Solder mask opening: For NSMD pads, the mask opening should be 75-100 micrometers larger than the copper pad diameter.
Via-in-Pad Considerations
Fine-pitch CSPs often require via-in-pad to escape route inner balls:
Vias must be filled and planarized (copper-filled preferred)
Unfilled vias cause solder wicking and voiding
Via diameter typically 100-150 micrometers for microvias
VIPPO (Via-In-Pad Plated Over) is the standard approach
Understanding when to choose CSP over alternatives helps optimize your design:
CSP vs BGA Comparison
Characteristic
CSP
Standard BGA
Package Size
Near die size
1.5-4× die size
Silicon Density
60-100%
20-50%
Ball Pitch
0.3-0.8mm
0.8-1.27mm
I/O Count
Typically <500
Up to 2000+
PCB Complexity
Higher
Lower
Thermal Performance
Good
Better (more balls)
Board-Level Reliability
Moderate
Better
Cost
Lower (at volume)
Higher
CSP vs QFN Comparison
Characteristic
CSP
QFN
Mounting Style
Area array
Perimeter + thermal pad
Size Efficiency
Highest
Very good
I/O Density
Higher
Limited by perimeter
Thermal Performance
Good
Excellent (exposed pad)
PCB Routing
More complex
Easier
Inspection
X-ray required
Easier (edge visible)
Rework
Difficult
Moderate
Cost
Medium
Lower
When to Choose CSP
Space is the primary constraint
Low-to-medium I/O count (under 500)
Electrical performance is critical (RF, high-speed)
Volume production justifies HDI PCB costs
Weight reduction matters (mobile, aerospace)
When to Choose Alternatives
High I/O count requirements (>500): Standard BGA
Cost-sensitive, moderate density: QFN
Thermal performance priority: QFN or large BGA
Ease of inspection and rework: QFN or leaded packages
Extended temperature range: Consider package reliability data
Common CSP Applications
Chip scale packaging enables countless modern electronic products:
Consumer Electronics
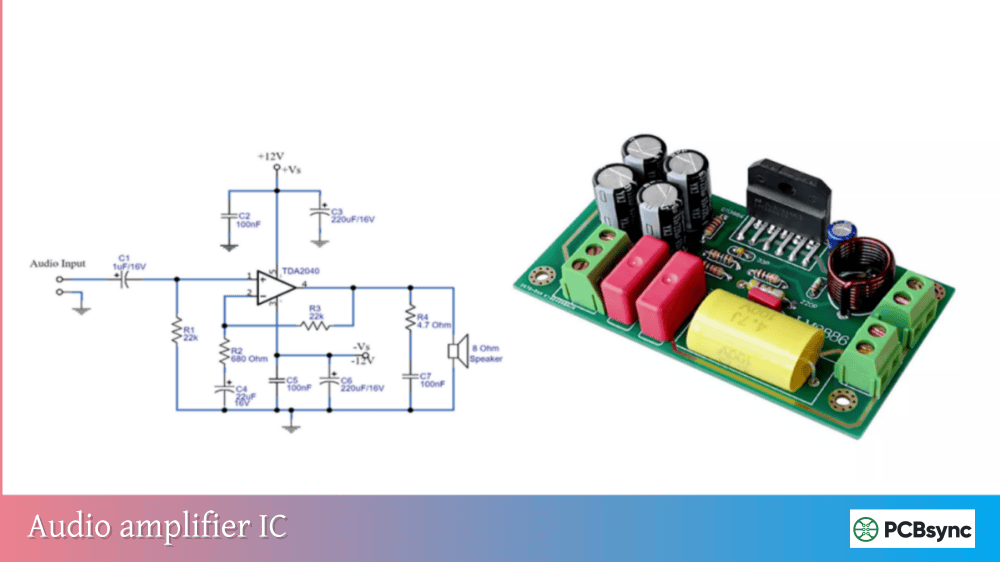
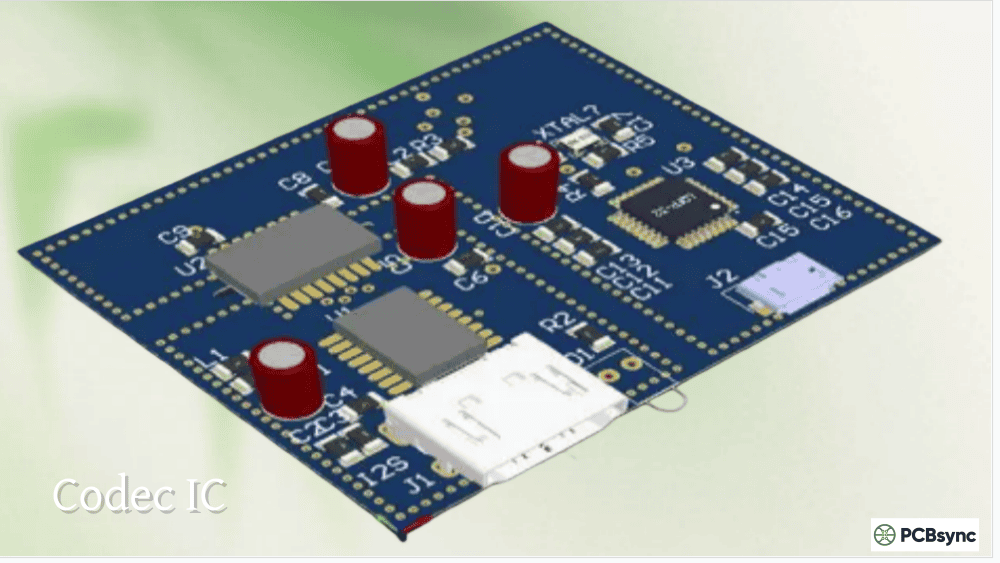
Smartphones use CSPs extensively for processors, memory, power management ICs, RF front-ends, sensors, and audio codecs. A single smartphone may contain 50+ CSP devices.
Wearables
Smartwatches, fitness trackers, and wireless earbuds depend on CSP miniaturization. The ultra-thin form factors of these devices would be impossible with conventional packaging.
IoT and Sensors
MEMS sensors, environmental sensors, and wireless connectivity modules commonly use WLCSP for minimal footprint in distributed sensor networks.
Medical Devices
Implantable devices, hearing aids, and portable diagnostic equipment leverage CSP technology for life-critical miniaturization.
Automotive
Advanced driver assistance systems (ADAS), infotainment, and vehicle networking increasingly adopt CSP for space and weight savings.
Computing
DDR memory, solid-state drive controllers, and laptop components use CSP variants for space efficiency in thin-and-light designs.
CSP Reliability Considerations
Designing for reliability requires understanding CSP-specific failure modes:
Solder Joint Fatigue
The primary reliability concern. CTE mismatch between silicon and FR-4 causes cyclic stress on solder joints during thermal excursions. Mitigation strategies:
Avoid placing CSPs at board edges where flex stress concentrates
Drop and Mechanical Shock
WLCSP solder joints can crack under mechanical shock. Solutions:
Apply underfill or corner staking
Use SMD (solder mask defined) pads
Strengthen mounting with adequate copper area
Avoid placing large CSPs near board mounting points
Moisture Sensitivity
CSPs typically achieve MSL-1 rating (unlimited floor life at <30°C/85% RH), but verify for your specific device. Baking may be required if packages have been improperly stored.
Useful Resources for CSP Design
Standards and Specifications
IPC/JEDEC J-STD-012: Implementation of Flip Chip and Chip Scale Technology
IPC-7351: Generic Requirements for Surface Mount Design
IPC-A-610: Acceptability of Electronic Assemblies
JEDEC JEP95: Design Guide for Ball Grid Array Packages
Altium Designer: Comprehensive CSP library support
Frequently Asked Questions
What is the difference between CSP and WLCSP?
CSP (Chip Scale Package) is a category of packages where the package area is no more than 1.2 times the die area. WLCSP (Wafer-Level CSP) is a specific type of CSP where packaging is performed at the wafer level before dicing, resulting in a package that is exactly the same size as the die (1:1 ratio). All WLCSPs are CSPs, but not all CSPs are WLCSPs. Other CSP types like FCCSP and LFCSP use interposers or leadframes and are slightly larger than the die.
Do CSP packages require special PCB technology?
It depends on the ball pitch. CSPs with 0.65mm pitch or larger can often use conventional PCB technology. Finer pitches (0.5mm and below) typically require HDI (High-Density Interconnect) technology with microvias for escape routing. Via-in-pad with filled and planarized vias becomes necessary for fine-pitch designs. Always consult your PCB fabricator early in the design process to confirm manufacturing capability.
How do I inspect CSP solder joints after assembly?
X-ray inspection is the primary method for CSP solder joint verification. Unlike perimeter packages where joints are partially visible, CSP joints are completely hidden under the package. Automated X-ray inspection (AXI) can detect voids, bridges, missing balls, and misalignment. Boundary scan (JTAG) testing verifies electrical connectivity. Destructive analysis using dye-and-pry or cross-sectioning is used for failure analysis and process qualification.
When should I use underfill with WLCSP?
Underfill is recommended when the application involves thermal cycling, mechanical shock, or vibration. Consumer electronics with short product lifecycles may not require underfill, while automotive, industrial, and medical applications typically do. The decision depends on reliability requirements, package size (larger packages stress joints more), and operating environment. Capillary underfill or corner staking are common options. Consult the component manufacturer’s reliability data for your specific use case.
Can I rework a CSP package?
Yes, but CSP rework is more challenging than larger packages. It requires specialized rework equipment with precise temperature control and small nozzles. The process involves locally heating the package to reflow temperature, removing it with vacuum pickup, cleaning the site, applying new solder paste, and placing the replacement component. For WLCSP, the fragile die requires careful handling. Success rates are lower than with larger packages, so design for first-pass assembly success whenever possible.
Conclusion
Chip scale package technology has fundamentally transformed electronics design, enabling the compact, powerful devices we rely on daily. From WLCSP’s ultimate miniaturization to FCCSP’s balance of size and reliability, the CSP package family provides solutions for virtually every space-constrained application.
Key takeaways for successful CSP implementation:
Understand the tradeoffs between CSP variants (WLCSP, FCCSP, LFCSP)
Match ball pitch to your PCB technology capability
Use NSMD pads for thermal cycling reliability, SMD for drop performance
Plan for via-in-pad with filled vias on fine-pitch designs
Consider underfill for applications with harsh environmental requirements
Invest in X-ray inspection capability or partner with assemblers who have it
Consult component datasheets and manufacturer application notes early
As semiconductor devices continue shrinking while functionality increases, chip scale packaging will remain at the forefront of electronics miniaturization. Whether you’re designing the next generation smartphone, a life-saving medical implant, or an industrial IoT sensor, understanding CSP technology is essential for competitive product development.
Inquire: Call 0086-755-23203480, or reach out via the form below/your sales contact to discuss our design, manufacturing, and assembly capabilities.
Quote: Email your PCB files to Sales@pcbsync.com (Preferred for large files) or submit online. We will contact you promptly. Please ensure your email is correct.
Notes: For PCB fabrication, we require PCB design file in Gerber RS-274X format (most preferred), *.PCB/DDB (Protel, inform your program version) format or *.BRD (Eagle) format. For PCB assembly, we require PCB design file in above mentioned format, drilling file and BOM. Click to download BOM template To avoid file missing, please include all files into one folder and compress it into .zip or .rar format.


