Inquire: Call 0086-755-23203480, or reach out via the form below/your sales contact to discuss our design, manufacturing, and assembly capabilities.
Quote: Email your PCB files to Sales@pcbsync.com (Preferred for large files) or submit online. We will contact you promptly. Please ensure your email is correct.
Notes: For PCB fabrication, we require PCB design file in Gerber RS-274X format (most preferred), *.PCB/DDB (Protel, inform your program version) format or *.BRD (Eagle) format. For PCB assembly, we require PCB design file in above mentioned format, drilling file and BOM. Click to download BOM template To avoid file missing, please include all files into one folder and compress it into .zip or .rar format.
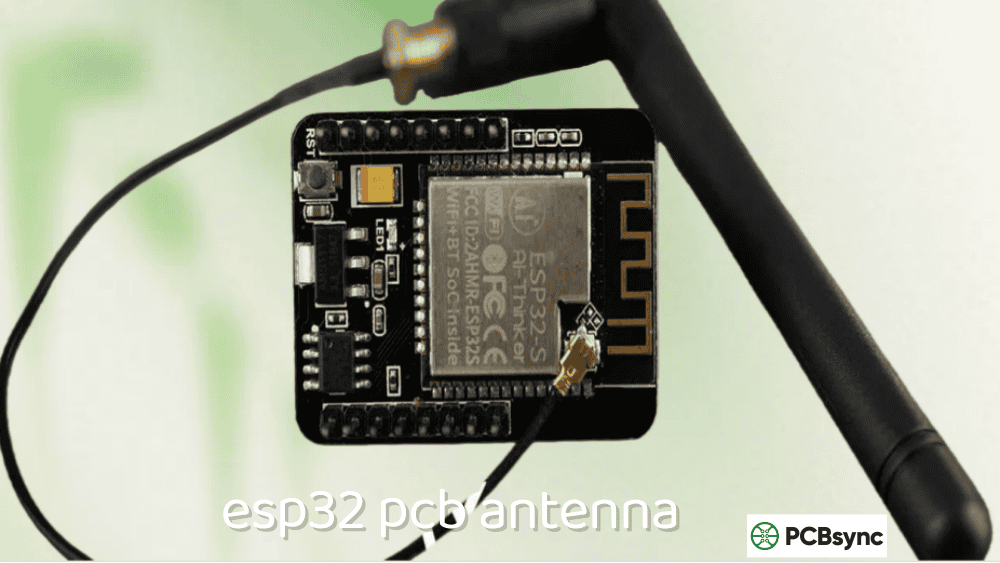
Designing a custom ESP32 PCB antenna is one of those tasks that looks straightforward until you realize Espressif’s chips don’t have 50Ω output impedance. I learned this the hard way on my first ESP32-C3 custom board—copied a generic 2.4 GHz antenna design, skipped the matching network, and ended up with a device that could barely connect to a router two meters away. The ESP32’s RF output impedance is approximately (30+j10)Ω, which means a matching network isn’t optional—it’s mandatory for acceptable WiFi and Bluetooth performance.
This guide covers everything you need to design a working ESP32 PCB antenna from scratch. Whether you’re creating a custom ESP32, ESP32-C3, ESP32-S2, or ESP32-S3 design, I’ll provide specific dimensions for inverted-F antennas (IFA), the CLC matching network values Espressif recommends, and the layout rules that make the difference between a product that works and one that doesn’t. I’ve also included resources for KiCad footprints and range optimization techniques for when your prototype doesn’t perform as expected.
Before diving into antenna design, you need to understand what makes the ESP32 different from other 2.4 GHz devices.
ESP32 Operating Frequencies
Band
Frequency Range
Application
WiFi 2.4 GHz
2400–2483.5 MHz
802.11 b/g/n
Bluetooth Classic
2402–2480 MHz
Audio, SPP
Bluetooth LE
2402–2480 MHz
Low energy IoT
Center frequency
2441 MHz
Design target
Your ESP32 PCB antenna must cover this entire 2400–2483.5 MHz range with acceptable return loss (S11 < -10 dB) across the band.
ESP32 RF Output Impedance (Critical!)
This is where most ESP32 antenna designs fail:
ESP32 Variant
Package
Output Impedance
Notes
ESP32 (original)
QFN 6×6
(30+j10)Ω
Requires matching
ESP32
QFN 5×5
(35+j10)Ω
Requires matching
ESP32-C3
QFN 5×5
~(30+j10)Ω
Requires matching
ESP32-S2
QFN 7×7
~(35+j10)Ω
Requires matching
ESP32-S3
QFN 7×7
~(35+j10)Ω
Requires matching
Key insight: The ESP32 RF output is NOT 50Ω. You cannot simply connect a 50Ω antenna directly to the RF pin—you must use a pi-type (CLC) matching network to transform the impedance. Skipping this step results in severe mismatch loss and dramatically reduced range.
2.4 GHz Wavelength Calculations
Parameter
Value
Notes
Center frequency
2441 MHz
WiFi channel 6
Wavelength (λ)
122.8 mm
Free space
Quarter wavelength (λ/4)
30.7 mm
Monopole/IFA length
λ/4 on FR4 (εr ≈ 4.4)
18–23 mm
Effective on PCB
ESP32 Variant Comparison for Antenna Design
Different ESP32 variants have slightly different RF characteristics and recommended layouts.
ESP32 Family Antenna Requirements
Variant
Cores
WiFi
BT
Recommended Antenna
Module Examples
ESP32
Dual
Yes
Classic + LE
IFA/MIFA
WROOM-32, WROVER
ESP32-C3
Single RISC-V
Yes
LE only
IFA/MIFA
ESP32-C3-WROOM-02
ESP32-S2
Single
Yes
No
IFA/MIFA
ESP32-S2-WROOM
ESP32-S3
Dual
Yes
LE only
IFA/MIFA
ESP32-S3-WROOM-1
ESP32-C6
Single RISC-V
Yes (WiFi 6)
LE
IFA/MIFA
ESP32-C6-WROOM-1
Module vs Chip-Down Design
Approach
Advantages
Disadvantages
Pre-made module
Certified antenna, no RF design
Larger, more expensive
Chip-down (custom)
Smaller, cheaper at volume
Requires RF expertise, certification
For most projects, I recommend starting with modules. Only go chip-down if you need the smallest possible size or are producing 10,000+ units where the BOM savings justify the engineering effort.
PCB Antenna Types for ESP32
Several antenna types work well for ESP32 PCB antenna implementations. Here’s when to use each.
Inverted-F Antenna (IFA)
The IFA is Espressif’s recommended antenna type for custom designs:
Characteristic
Value
Notes
Type
Quarter-wave derivative
Folded monopole
Impedance
Adjustable via geometry
Target 50Ω after matching
Bandwidth
80–150 MHz
Covers 2.4 GHz band
Gain
1.5–2.5 dBi
Typical
Polarization
Linear
Vertical when PCB horizontal
Size
~20×8 mm
Typical footprint
Meandered Inverted-F Antenna (MIFA)
MIFA folds the radiating element to save space:
Characteristic
Value
Notes
Size reduction
20–40% vs IFA
Space savings
Bandwidth
60–100 MHz
Slightly narrower
Efficiency
80–90%
Slightly lower than IFA
Best for
Compact designs
Wearables, small sensors
Chip Antenna
Pre-made ceramic chip antennas are an alternative to PCB trace antennas:
Characteristic
Value
Notes
Size
3×2×1 mm typical
Very compact
Efficiency
60–80%
Lower than PCB antenna
Cost
$0.15–0.50
Per unit
Design effort
Low
Follow datasheet
Performance
Moderate
Ground plane critical
Antenna Type Selection Guide
Application
Recommended Antenna
Why
IoT sensor (space available)
IFA
Best performance
Compact wearable
MIFA or chip
Size constraint
High-volume product
Chip antenna
Easier manufacturing
Maximum range
IFA with proper matching
Best efficiency
Prototype/development
Module with PCB antenna
Pre-certified
ESP32 IFA Dimension Tables
These dimensions are based on Espressif’s reference designs and my own validated implementations. Your ESP32 PCB antenna should start with these values and be fine-tuned with VNA measurements.
When using pre-made ESP32 modules on a carrier board, antenna placement affects performance significantly.
Correct Module Placement Positions
Position
Recommendation
Performance
Corner, antenna outside board edge
✓ Strongly recommended
Best
Edge, antenna outside board edge
✓ Good
Good
Corner, antenna over board
✗ Not recommended
Poor
Center of board
✗ Avoid
Worst
Antenna Overhang Requirements
Scenario
Requirement
Ideal
Antenna extends beyond base board edge
Acceptable
Antenna at board edge, no copper underneath
Not recommended
Any base board copper under antenna
If copper under antenna unavoidable
Cut out base board under antenna area
Base Board Ground Connection
Connection Point
Requirement
Module edge pads
Connect to base board ground
Center ground pads
Connect to base board ground
Via count
Minimum 5 vias per ground pad
Via size
0.3 mm drill minimum
Implementing ESP32 PCB Antenna in KiCad
Many engineers use KiCad for ESP32 projects. Here’s how to implement the antenna correctly.
Importing Antenna Footprints
Resource
Source
Format
Espressif reference
espressif.com/support/download
Pads/Mentor (need conversion)
Community KiCad library
github.com/prasad-dot-ws/ESP32_MIFA_PCB_ANTENNA
KiCad native
TI reference designs
ti.com/lit/an/swra117d
DXF/PDF
KiCad Antenna Implementation Steps
Step
Action
Notes
1
Import DXF or create from dimensions
Use F.Cu layer
2
Create keep-out zone
All layers, 15 mm
3
Place matching network footprints
0201 or 0402
4
Route 50Ω RF trace
Use trace calculator
5
Add via stitching
Around RF section
6
Generate Gerbers
Verify antenna geometry
50Ω Trace Calculator Settings
Parameter
4-Layer (0.2mm to L2)
2-Layer (1.6mm)
Substrate εr
4.4 (FR4)
4.4 (FR4)
Substrate height
0.2 mm
1.6 mm
Copper thickness
35 µm (1 oz)
35 µm (1 oz)
50Ω trace width
~0.36 mm
~3.0 mm
Improving ESP32 WiFi Range
If your ESP32 PCB antenna isn’t performing as expected, here’s how to diagnose and fix the issues.
Diagnosing Antenna Problems
Symptom
Likely Cause
Solution
Very short range (< 5m)
Missing/wrong matching
Verify CLC values with VNA
Inconsistent connection
Antenna detuned
Check keep-out zones
Works close, fails far
Low efficiency
Check component Q values
One direction poor
Pattern distortion
Check ground plane
Drops when touched
Poor isolation
Increase ground plane
RSSI Benchmarking
Distance (LOS)
Expected RSSI
Indicates Problem If
1 meter
-30 to -40 dBm
> -50 dBm
5 meters
-50 to -60 dBm
> -70 dBm
10 meters
-60 to -70 dBm
> -80 dBm
20 meters
-70 to -80 dBm
> -90 dBm
External Antenna Options
For maximum range or difficult RF environments:
Module Type
Antenna Connector
Compatible Antennas
ESP32-WROOM-32U
U.FL (IPEX)
2.4 GHz external
ESP32-WROVER-I
IPEX
2.4 GHz external
ESP32-S3-WROOM-1U
U.FL
2.4 GHz external
Wire Antenna Modification (Emergency Fix)
If your design has poor range and redesign isn’t possible:
Parameter
Value
Notes
Wire length
31 mm
Quarter wave at 2.4 GHz
Wire gauge
22–26 AWG
Solid copper
Attachment
Solder to antenna feed
Parallel to existing
Expected improvement
+6 to +10 dB
Significant
Caution: This modification changes the antenna pattern and may affect certification. Use only for prototypes or non-certified applications.
Common ESP32 PCB Antenna Mistakes
Mistake 1: Skipping the Matching Network
Problem: Connecting antenna directly to ESP32 RF pin. Effect: VSWR > 3:1, severely reduced range. Solution: Always include CLC pi-network.
Mistake 2: Copper Under Antenna
Problem: Ground plane or traces beneath antenna area. Effect: Antenna detuned by 100–200 MHz, very poor performance. Solution: Clear all copper from antenna area on all layers.
Mistake 3: Insufficient Keep-Out Zone
Problem: Components or traces within 15 mm of antenna. Effect: Detuning, pattern distortion, reduced efficiency. Solution: Enforce 15 mm clearance in all directions.
Mistake 4: Wrong PCB Thickness Compensation
Problem: Using reference dimensions without adjusting for board thickness. Effect: Resonance at wrong frequency. Solution: Adjust antenna length per thickness table above.
Mistake 5: Using Generic 2.4 GHz Antenna Dimensions
Problem: Copying antenna from non-ESP32 design without matching network. Effect: Impedance mismatch due to ESP32’s non-50Ω output. Solution: Use ESP32-specific reference PCB designs with proper matching.
Why does my custom ESP32 board have much worse WiFi range than a DevKit?
The most common cause is missing or incorrect matching network. Unlike many 2.4 GHz chips that have 50Ω output impedance, the ESP32 family outputs approximately (30+j10)Ω. DevKit modules include a properly tuned CLC matching network. If you copied only the antenna without the matching components, you’re looking at 3–6 dB of mismatch loss before the signal even reaches the antenna. Verify your matching network values with a VNA, and ensure you’re using the CLC topology with appropriate component values for your specific ESP32 variant.
Can I use any 2.4 GHz antenna design for the ESP32?
You can use any 2.4 GHz antenna geometry (IFA, MIFA, patch, etc.), but you must include a matching network designed for the ESP32’s non-50Ω output impedance. Generic 2.4 GHz antenna designs assume 50Ω source impedance. The ESP32’s (30+j10)Ω output means you need the CLC pi-network to transform this to 50Ω before feeding the antenna. Simply copying a TI or Nordic antenna design without the ESP32-specific matching will result in poor performance.
What’s the minimum ground plane size for an ESP32 PCB antenna?
Espressif recommends a minimum ground plane of approximately 25 × 18 mm for acceptable antenna performance. Smaller ground planes will detune the antenna and reduce efficiency. For best results, maximize ground plane size within your product constraints. The ground plane should be continuous (no splits or slots) in the area near the antenna and RF traces. If your design requires a smaller ground plane, consider using a chip antenna instead of a PCB trace antenna, as chip antennas are specifically designed to work with limited ground planes.
How do I know if my ESP32 antenna is working correctly?
Measure the antenna using a VNA (NanoVNA works fine for 2.4 GHz). Connect to the RF pin through your matching network and look for S11 < -10 dB across 2400–2483.5 MHz. The resonant frequency (minimum S11) should be near 2441 MHz. If resonance is off, adjust antenna length or matching components. Also compare RSSI readings against a known-good module at the same distance—within 3–5 dB is acceptable, differences greater than 10 dB indicate a problem with matching, layout, or keep-out zones.
Should I use a module or design chip-down for my ESP32 product?
For most projects, start with modules (ESP32-WROOM-32, ESP32-C3-MINI, etc.). These have pre-certified antennas, tested matching networks, and don’t require RF expertise. Go chip-down only if: (1) you need smaller size than modules allow, (2) you’re producing 10,000+ units where per-unit savings justify engineering costs, or (3) you need specific antenna placement that modules can’t accommodate. Chip-down design requires RF simulation, VNA measurement, and potentially FCC/CE certification testing—budget $5,000–15,000 for proper certification of a custom RF design.
Conclusion
Designing a successful ESP32 PCB antenna requires understanding the specific RF characteristics of Espressif’s chips—particularly the non-50Ω output impedance that makes matching networks mandatory. Unlike other 2.4 GHz designs where you might get away with connecting an antenna directly, the ESP32 family requires the CLC pi-network to transform (30+j10)Ω to 50Ω for proper power transfer.
Start with Espressif’s reference designs and the dimension tables provided in this guide. Use the IFA or MIFA topology unless you have specific reasons to choose otherwise. Pay careful attention to the 15 mm keep-out zone—this single requirement causes more ESP32 antenna failures than any other factor. Ensure no copper exists under the antenna on any layer, and maintain proper clearance from high-frequency components like crystals and USB interfaces.
For prototypes and low-volume production, I strongly recommend using pre-made modules with integrated PCB antennas. The ESP32-WROOM-32, ESP32-C3-MINI, and ESP32-S3-WROOM-1 modules include properly matched antennas that have passed certification testing. Only invest in custom chip-down designs when volume justifies the engineering effort and certification costs.
Test your design with a NanoVNA before committing to production. Verify S11 < -10 dB across the full 2.4 GHz band, compare RSSI to a reference module, and check range in your actual application environment. With proper attention to matching, layout, and keep-out zones, your custom ESP32 PCB antenna will deliver WiFi and Bluetooth performance that matches or exceeds the commercial modules.
Inquire: Call 0086-755-23203480, or reach out via the form below/your sales contact to discuss our design, manufacturing, and assembly capabilities.
Quote: Email your PCB files to Sales@pcbsync.com (Preferred for large files) or submit online. We will contact you promptly. Please ensure your email is correct.
Notes: For PCB fabrication, we require PCB design file in Gerber RS-274X format (most preferred), *.PCB/DDB (Protel, inform your program version) format or *.BRD (Eagle) format. For PCB assembly, we require PCB design file in above mentioned format, drilling file and BOM. Click to download BOM template To avoid file missing, please include all files into one folder and compress it into .zip or .rar format.


