Inquire: Call 0086-755-23203480, or reach out via the form below/your sales contact to discuss our design, manufacturing, and assembly capabilities.
Quote: Email your PCB files to Sales@pcbsync.com (Preferred for large files) or submit online. We will contact you promptly. Please ensure your email is correct.
Notes: For PCB fabrication, we require PCB design file in Gerber RS-274X format (most preferred), *.PCB/DDB (Protel, inform your program version) format or *.BRD (Eagle) format. For PCB assembly, we require PCB design file in above mentioned format, drilling file and BOM. Click to download BOM template To avoid file missing, please include all files into one folder and compress it into .zip or .rar format.
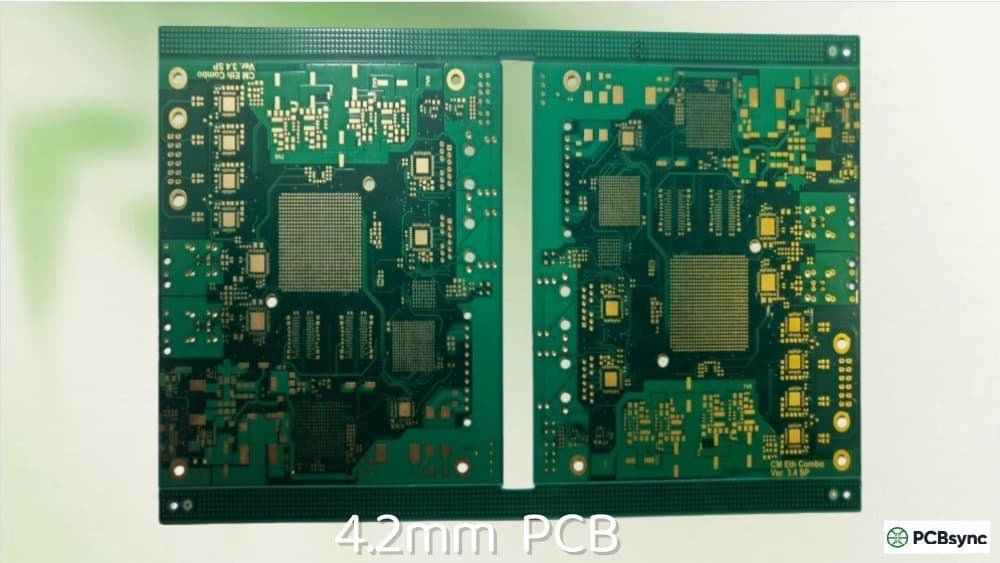
Sometimes 4.0mm just isn’t enough. After working on dozens of backplane projects over the years, I’ve encountered this situation more often than you might expect – the design needs slightly more thickness for additional layers or copper weight, but jumping to 4.5mm or 5.0mm feels like overkill. That’s exactly where a 4.2mm PCB becomes the smart engineering choice.
A 4.2mm PCB (165 mil or 0.165″) represents a custom thickness increment within backplane territory. While 4.0mm marks the official entry point into backplane manufacturing, specifying 4.2mm gives you that extra margin for 26-32 layer designs, heavier copper integration, or enhanced mechanical rigidity without the cost penalty of significantly thicker boards.
In this guide, I’ll explain when and why you should consider a 4.2mm PCB for your next backplane project, including stack-up strategies, manufacturing considerations, and the real-world trade-offs you’ll face.
The decision to specify a 4.2mm PCB typically comes down to one simple reality: your design has outgrown 4.0mm, but doesn’t justify 4.5mm or thicker. This 0.2mm increment might seem small, but it translates to meaningful engineering benefits.
The 4.2mm PCB hits a practical middle ground. You gain 5% additional thickness for stack-up flexibility without the significant cost jump that comes with thicker boards.
When Does Your Design Need a 4.2mm PCB?
Based on my experience, engineers typically land on 4.2mm PCB specifications in these scenarios:
Scenario 1: Layer Count Pushed to the Limit
When your 4.0mm stack-up calculation comes out tight – say, you need 28 layers with 1oz inner copper and proper impedance control – that extra 0.2mm provides breathing room. Instead of squeezing dielectric thicknesses to uncomfortable minimums, you maintain standard prepreg and core combinations.
Scenario 2: Heavy Copper Integration
Adding 2oz or 3oz copper to power layers in a 4.0mm board reduces available dielectric thickness. A 4.2mm PCB absorbs this copper weight while maintaining proper layer spacing for signal integrity.
Scenario 3: Press-Fit Connector Reliability
Some press-fit connector specifications recommend board thicknesses slightly above 4.0mm for optimal pin retention. The 4.2mm PCB provides that extra copper sleeve length without going to a full 4.5mm board.
Scenario 4: Thermal Mass Requirements
High-power backplanes benefit from additional thermal mass. A 4.2mm PCB offers approximately 5% more material for heat spreading compared to 4.0mm.
4.2mm PCB Stack-Up Design Strategies
Designing a stack-up for a 4.2mm PCB requires balancing layer count, copper weights, and dielectric thicknesses. Here’s a practical 28-layer example that I’ve used successfully.
28-Layer 4.2mm PCB Stack-Up Example
Layer
Function
Material
Thickness (mm)
Copper Weight
L1
Signal (Top)
Copper
0.035
1oz
PP
Prepreg 2116
FR-4 High Tg
0.127
–
L2
Ground
Copper
0.035
1oz
Core
Core
FR-4
0.100
–
L3
Signal
Copper
0.018
0.5oz
PP
Prepreg 1080×2
FR-4
0.152
–
L4
Power
Copper
0.035
1oz
Core
Core
FR-4
0.100
–
L5-L24
Signal/Power/GND
Various
~3.2
Mixed
Core
Core
FR-4
0.100
–
L25
Power
Copper
0.035
1oz
PP
Prepreg 1080×2
FR-4
0.152
–
L26
Signal
Copper
0.018
0.5oz
Core
Core
FR-4
0.100
–
L27
Ground
Copper
0.035
1oz
PP
Prepreg 2116
FR-4
0.127
–
L28
Signal (Bottom)
Copper
0.035
1oz
Total
~4.2mm
The key principle remains symmetry – your 4.2mm PCB stack-up must be balanced around the center point to prevent warpage during lamination.
Heavy Copper 4.2mm PCB Configuration
When power distribution requires heavier copper, a 4.2mm PCB accommodates this more comfortably than 4.0mm:
Aspect ratio management becomes increasingly critical as board thickness grows. For a 4.2mm PCB, the math directly impacts your via strategy.
4.2mm PCB Via Sizing Guidelines
Via Type
Drill Diameter
Aspect Ratio
Plating Reliability
Minimum (advanced)
0.42mm (16.5 mil)
10:1
Challenging
Recommended
0.45mm (18 mil)
9.3:1
Good
Conservative
0.50mm (20 mil)
8.4:1
Excellent
Standard PTH
0.55mm (22 mil)
7.6:1
Standard
My recommendation for 4.2mm PCB designs: specify 0.45mm minimum via diameter as your baseline. This keeps you under the 10:1 aspect ratio threshold while providing reasonable routing density.
Blind and Buried Via Strategies
For high-density 4.2mm PCB designs, consider sequential lamination with blind and buried vias:
Isola Laminate Selector – FR-4 and high-performance options
Panasonic Megtron Series – Low-loss materials for high-speed
Rogers Corporation – High-frequency laminates
Ventec International – Comprehensive material data sheets
Frequently Asked Questions About 4.2mm PCB
Is 4.2mm a standard PCB thickness?
No, 4.2mm is a custom thickness. Standard thick-board increments typically include 3.2mm, 4.0mm, 4.5mm, and 5.0mm. However, most backplane-capable fabricators can produce 4.2mm boards by adjusting their laminate combinations. Expect slightly longer lead times and modest cost premiums compared to standard thicknesses.
What’s the maximum layer count for a 4.2mm PCB?
A 4.2mm PCB typically supports 26-32 layers depending on copper weights and dielectric requirements. With thin cores (0.1mm) and 0.5oz inner copper, you can push toward 32 layers. With heavy copper (2-3oz) on power layers, expect 22-26 layers maximum while maintaining proper signal integrity.
How does 4.2mm PCB affect via design?
At 4.2mm thickness, maintaining a 10:1 aspect ratio requires minimum via diameters of 0.42mm. I recommend using 0.45mm vias for manufacturing margin. For higher routing density, consider blind and buried via structures that reduce effective drilling depth and improve aspect ratios.
Why not just use 4.5mm instead of 4.2mm PCB?
A 4.5mm PCB costs 20-30% more than 4.0mm, while 4.2mm typically adds only 10-15%. If your design works at 4.2mm, the cost savings are significant, especially in production volumes. Additionally, 4.2mm maintains slightly better aspect ratios for via plating than 4.5mm with the same drill sizes.
What surface finish works best for 4.2mm PCB with press-fit connectors?
Immersion tin (ImSn) remains the preferred surface finish for thick boards with press-fit connectors. HASL is not recommended for boards thicker than 2.4mm due to thermal stress concerns during the hot air leveling process. ENIG works but may increase insertion forces during press-fit assembly.
Conclusion: Is a 4.2mm PCB Right for Your Project?
Specifying a 4.2mm PCB makes sense when your design has genuinely outgrown 4.0mm but doesn’t require the full jump to 4.5mm or thicker. This custom thickness provides that 5% additional margin for layer count, copper weight, or mechanical requirements without the 20-30% cost premium of significantly thicker boards.
The key considerations for a 4.2mm PCB decision include:
Layer counts in the 26-32 range with comfortable dielectrics
Heavy copper requirements that strain 4.0mm stack-ups
Press-fit applications benefiting from extra board thickness
Budget sensitivity that makes 4.5mm+ undesirable
Work closely with your fabricator from project inception. Custom thickness requires coordination on material selection, stack-up optimization, and realistic lead time planning. The extra engineering effort pays off in a design that meets your requirements without over-specifying thickness or over-spending on materials.
When 4.0mm falls short but 4.5mm feels excessive, the 4.2mm PCB delivers the precision solution that experienced backplane engineers appreciate.
Inquire: Call 0086-755-23203480, or reach out via the form below/your sales contact to discuss our design, manufacturing, and assembly capabilities.
Quote: Email your PCB files to Sales@pcbsync.com (Preferred for large files) or submit online. We will contact you promptly. Please ensure your email is correct.
Notes: For PCB fabrication, we require PCB design file in Gerber RS-274X format (most preferred), *.PCB/DDB (Protel, inform your program version) format or *.BRD (Eagle) format. For PCB assembly, we require PCB design file in above mentioned format, drilling file and BOM. Click to download BOM template To avoid file missing, please include all files into one folder and compress it into .zip or .rar format.


