Inquire: Call 0086-755-23203480, or reach out via the form below/your sales contact to discuss our design, manufacturing, and assembly capabilities.
Quote: Email your PCB files to Sales@pcbsync.com (Preferred for large files) or submit online. We will contact you promptly. Please ensure your email is correct.
Notes: For PCB fabrication, we require PCB design file in Gerber RS-274X format (most preferred), *.PCB/DDB (Protel, inform your program version) format or *.BRD (Eagle) format. For PCB assembly, we require PCB design file in above mentioned format, drilling file and BOM. Click to download BOM template To avoid file missing, please include all files into one folder and compress it into .zip or .rar format.
ESR Meters: Testing Capacitor Health & Quality Every Technician Should Understand
There is a specific frustration in electronics repair and power supply debugging that every experienced engineer recognizes: the board has failed, the obvious culprits have been checked, the voltages look plausible, the components measure in range — and yet the circuit doesn’t work. Then someone reaches for an ESR meter, touches the probes to the bulk electrolytic on the switching converter output, and the reading is 4.7Ω on a capacitor that should be 80mΩ. Problem found. Thirty seconds of measurement versus two hours of substitution and speculation.
The ESR meter is the instrument that closes this diagnostic gap. A digital multimeter’s capacitance function checks whether a capacitor has approximately the right capacitance value. What it cannot do is tell you whether the internal resistance of that capacitor — the equivalent series resistance, or ESR — has degraded to the point where the component is functionally useless in its application despite reading the right nominal value. For aluminum electrolytic capacitors in switching power supplies, audio amplifiers, motor drives, and any other power electronics circuit, ESR degradation is the primary aging failure mode. Catching it requires an ESR meter.
This guide covers what ESR actually is, why it matters, how ESR meters work, which instruments suit which applications, how to interpret readings correctly, and the practical techniques that make in-circuit ESR testing genuinely reliable — written from the perspective of an engineer who has used ESR meters as a primary diagnostic tool across power electronics repair and production test.
What ESR Is and Why It Degrades in Aluminum Electrolytic Capacitors
The Physics Behind Equivalent Series Resistance
Equivalent series resistance is the total resistive loss in a capacitor modeled as a single series resistance element. It encompasses several physical contributors: the resistance of the metal leads and foil electrodes, the contact resistance between foil and terminal, and — for aluminum electrolytic capacitors, the dominant contributor — the ionic resistance of the liquid electrolyte between the foil plates.
In a new electrolytic capacitor, ESR is determined primarily by electrolyte formulation and electrode geometry. A well-designed 1000µF/25V low-impedance series electrolytic might have ESR of 30–60mΩ at 100kHz. As the capacitor ages under operating conditions — elevated temperature, ripple current stress, time — the electrolyte slowly evaporates through the rubber seal, the electrolyte volume decreases, the ionic resistance between plates rises, and ESR increases. The capacitance value, by contrast, often remains within its ±20% specification long after ESR has climbed to five or ten times its original value.
This asymmetry — capacitance stable while ESR degrades — is precisely why a multimeter capacitance check gives false confidence on aged electrolytics and why an ESR meter is the correct diagnostic tool for any circuit where electrolytic capacitor health is in question.
How Rising ESR Damages Circuit Performance
The circuit consequences of elevated ESR are direct and measurable. In a switching power supply output filter, the output ripple voltage has two components: one determined by capacitance (the charge/discharge ripple) and one determined by ESR (the resistive voltage drop from ripple current through ESR). The ESR component is simply V = I_ripple × ESR. When ESR rises from 60mΩ to 600mΩ, the ESR-determined ripple voltage increases tenfold — enough to push a previously compliant power supply outside its ripple specification and start causing downstream logic errors or analog circuit misbehavior.
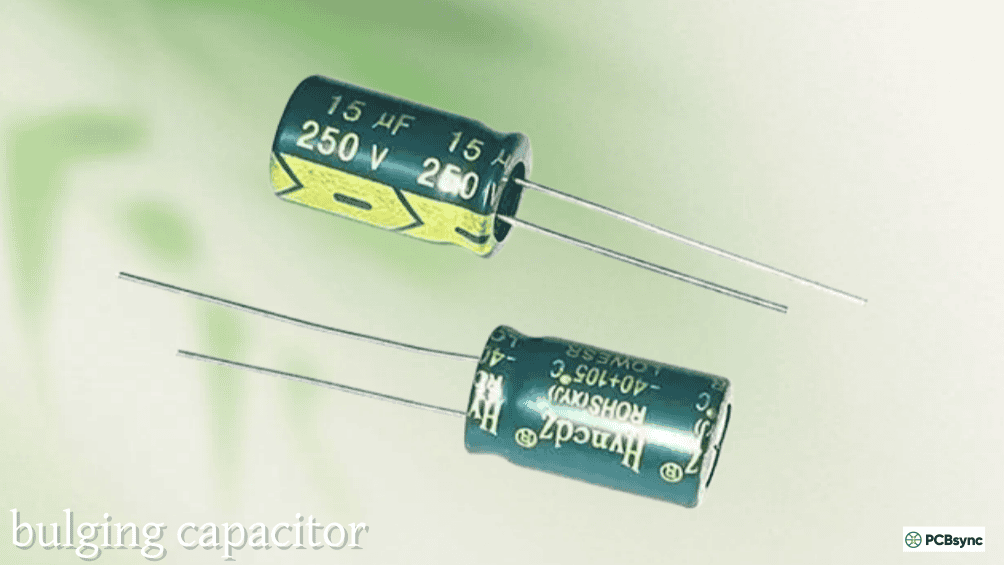
Beyond ripple voltage, elevated ESR means more power dissipated internally in the capacitor as heat: P = I_ripple² × ESR. A capacitor with 10× its original ESR dissipates 10× more heat per unit of ripple current. This self-heating accelerates electrolyte evaporation further, creating a positive feedback loop that ends in catastrophic capacitor failure — bulging, venting, or in worst cases, rupture of the pressure relief valve.
How an ESR Meter Works
The 100kHz Test Principle
A dedicated ESR meter applies a low-voltage, low-frequency AC test signal — typically a sine or square wave at 100kHz — directly across the capacitor under test and measures the in-phase (resistive) component of the resulting impedance. At 100kHz, the capacitive reactance of any electrolytic capacitor with more than a few microfarads of capacitance is well below 1Ω, effectively appearing as a short circuit at that frequency. The dominant measured impedance at 100kHz is therefore the ESR itself — the resistive component that the test signal sees.
The choice of 100kHz is deliberate and practical: it matches the typical switching frequency range of switching power supplies (50kHz–300kHz), so the ESR measurement at 100kHz directly reflects the component’s resistance in its most common demanding application. It is also low enough in voltage (typically 50–100mV peak) that silicon junctions in components parallel to the capacitor under test remain reverse-biased or below their forward threshold, making in-circuit measurement meaningful without desoldering.
In-Circuit Testing: Why It Works at 100kHz
The in-circuit capability of an ESR meter is its most operationally valuable feature and deserves a clear explanation of why it’s valid. At 100kHz, the impedance of most capacitors in circuit is very low — milliohms to low ohms. Resistors in parallel with the capacitor being tested are typically hundreds or thousands of ohms, making them high-impedance relative to the capacitor’s 100kHz impedance. The ESR meter therefore “sees” primarily the ESR of the capacitor, with only small perturbation from parallel circuit elements.
The significant exceptions — the cases where in-circuit ESR readings are unreliable — are parallel low-resistance paths: transformer windings with low DC resistance, parallel capacitors in the same filter bank, or very low-value resistors directly across the test point. When readings seem suspiciously uniform across all capacitors on a board, or suspiciously low, check for parallel low-resistance paths before concluding the capacitors are all healthy.
ESR Meter Types: From Basic Handheld to Professional Bench Instruments
Dedicated Handheld ESR Meters
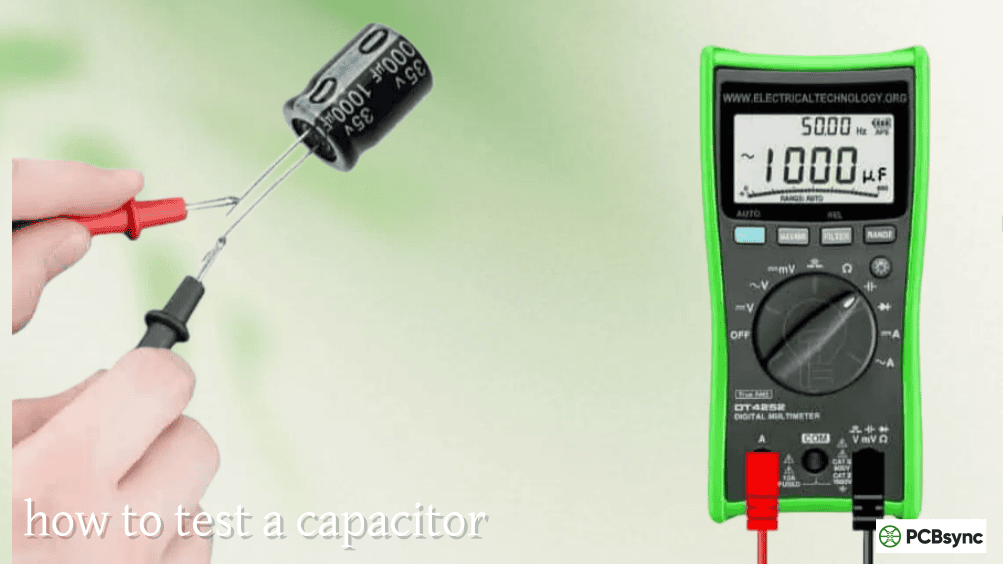
The dedicated handheld ESR meter is the instrument category most engineers should own for repair and maintenance work. It does one primary job — measure ESR — and does it quickly with minimal setup. The test procedure is: power off the board, touch the probes to the capacitor, read the value. No desoldering, no component removal, no range selection in most units.
Instrument
ESR Range
Capacitance?
Accuracy
In-Circuit
Price Range
MESR-100
0.001Ω – 100Ω
Yes (basic)
±5–10%
Yes
$25–$50
Bob Parker ESR Meter (DIY)
0–10Ω
No
±10–15%
Yes
$15–$40 (kit)
Peak Atlas ESR70
0–40Ω
Yes
±3–5%
Yes
$80–$110
Peak Atlas ESR80
0–40Ω
Yes + data log
±2–3%
Yes
$120–$160
Anatek Component Shop ESR
0–20Ω
No
±5%
Yes
$80–$130
Blue ESR Meter (Dick Smith / EVB)
0–100Ω
No
±5–10%
Yes
$30–$60
The Peak Electronics Atlas ESR70 and ESR80 are widely regarded as the best-value dedicated ESR meters combining good accuracy, auto-ranging, capacitance measurement, and rugged build quality. For pure in-circuit triage work where speed matters over precision, the MESR-100 is a legitimate budget choice that the repair community has widely validated.
The Bob Parker ESR meter — a well-documented DIY design that has been in continuous community production since the 1990s — remains functionally excellent for basic ESR screening and is worth mentioning because it has trained thousands of technicians in the practical application of ESR testing.
LCR Meters Used for ESR Measurement
A quality handheld or benchtop LCR meter measures ESR as the Rs (series resistance) component alongside capacitance, dissipation factor, and other parameters. At 100kHz test frequency, the Rs reading directly corresponds to ESR. The advantage over a dedicated ESR meter is simultaneous capacitance measurement and variable frequency capability — you can measure ESR at 1kHz, 10kHz, and 100kHz to profile how ESR changes with frequency, which is useful for component characterization and distinguishing different failure modes.
The DE-5000 handheld LCR meter at 100kHz test frequency is a practical and accurate ESR measurement tool that doubles as a full LCR instrument. For engineers who want a single instrument that handles both detailed component characterization and fast ESR screening, a multi-frequency LCR meter is the better investment than a dedicated ESR meter alone.
ESR Measurement in Benchtop LCR Meters and Impedance Analyzers
For incoming inspection, production test, and detailed failure analysis, benchtop LCR meters (Hioki IM3523, Keysight E4980A) provide ESR measurement with accuracies down to ±0.1% and four-terminal Kelvin connections that eliminate contact resistance errors. At milliohm ESR values — polymer electrolytic and large film capacitors — two-terminal ESR measurements are dominated by contact resistance, and four-terminal measurement is the only approach that delivers credible data.
Practical ESR Meter Usage: Technique That Makes the Difference
The Correct In-Circuit ESR Testing Workflow
Done carelessly, in-circuit ESR testing produces inconsistent results that waste time. Done correctly, it is among the most efficient diagnostic techniques in electronics service. The workflow that delivers reliable results:
Step 1 — Power the board off completely. ESR meters apply a small AC test signal, but any powered circuit will corrupt the reading. Verify the supply is off and the board is not being back-powered through any connected peripherals.
Step 2 — Discharge large capacitors. Large electrolytics hold charge for minutes after power-off. A residual charge of even a few volts will offset the ESR reading. Short the capacitor terminals briefly with a discharge resistor (10kΩ for most values, leaving for a few seconds).
Step 3 — Make firm, clean probe contact. Oxide on PCB pads or capacitor leads adds contact resistance directly to the ESR reading. Use sharp probe tips and apply enough pressure to penetrate any surface oxidation. Wipe probe tips with isopropyl alcohol periodically.
Step 4 — Read and compare against reference. Compare the measured ESR against the expected value for that capacitor type, value, and voltage rating. Use published ESR tables or the manufacturer’s datasheet impedance specification at 100kHz.
Step 5 — Retest any suspect readings out-of-circuit. If an in-circuit reading seems elevated, desolder and retest. Confirm the failure is in the component, not a parallel circuit element.
ESR Reference Values: Pass, Marginal, Fail
These reference values represent practical experience-based thresholds. Always cross-reference against the specific component’s datasheet impedance specification when available.
Capacitance
Voltage Rating
Good ESR (Ω)
Marginal ESR (Ω)
Reject ESR (Ω)
1µF – 10µF
Any
< 5
5–15
> 15
22µF – 47µF
16–35V
< 2
2–6
> 6
100µF
16V
< 0.5
0.5–2
> 2
100µF
50V
< 1
1–3
> 3
220µF – 470µF
16–25V
< 0.3
0.3–1
> 1
1000µF
16V
< 0.15
0.15–0.5
> 0.5
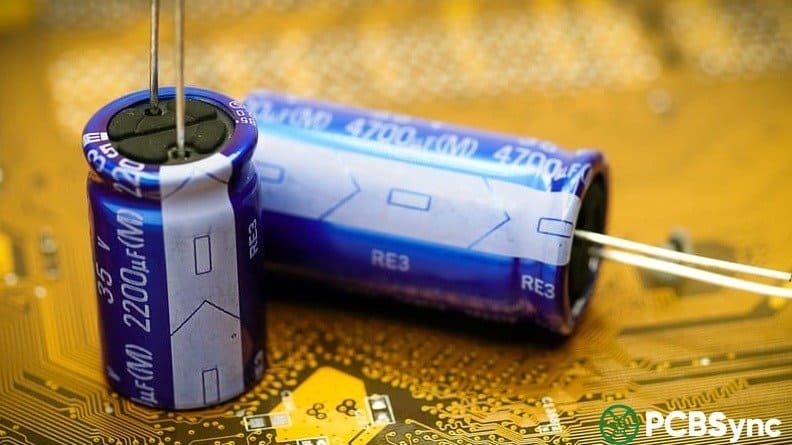
2200µF
25V
< 0.08
0.08–0.3
> 0.3
4700µF
50V
< 0.05
0.05–0.2
> 0.2
Capacitors reading in the marginal band should be considered for replacement in any circuit where reliable operation matters — particularly in switching power supplies where marginal ESR produces measurably increased output ripple that degrades system performance before outright failure occurs.
Several specific situations produce ESR readings that do not reflect actual capacitor condition:
Large parallel capacitors in the same filter bank. A healthy 1000µF cap in parallel with a failed 1000µF cap (in the same power rail filter bank) will pull the measured ESR lower than the failed cap’s true value, possibly into the “good” range. If you suspect one of several parallel capacitors is bad, measure each individually or desolder suspects for individual testing.
Electrolytic capacitors below 1µF. The capacitive reactance of small electrolytic values is not negligibly small at 100kHz, so the measured impedance includes a significant capacitive component mixed with the ESR. Dedicated ESR meters designed around the assumption of negligible reactance can give unreliable results for values below approximately 1µF. A multi-frequency LCR meter with the ability to separate resistance and reactance components is more appropriate for these values.
Tantalum capacitors. Tantalum capacitors have different ESR characteristics from aluminum electrolytics — generally lower ESR at room temperature but increasing more sharply at low temperature. More importantly, elevated leakage current in degraded tantalum capacitors is often a more relevant failure indicator than ESR alone. An ESR reading within range does not rule out tantalum failure — always combine ESR measurement with a leakage current check on tantalum types.
ESR Meter Applications Beyond Power Supply Repair
The ESR meter’s reputation is built on switching power supply diagnostics, but its useful applications extend further:
Audio amplifier service. Filter electrolytics in audio amplifier power supplies, coupling capacitors in older designs, and DC-blocking electrolytics in speaker output stages all degrade with ESR increase. An ESR meter screens a vintage amplifier’s capacitor bank in minutes — identifying candidates for a recapping job before the amplifier fails in service.
CRT monitor and television service. The power supply and horizontal deflection stages of CRT-based equipment are electrolytic-intensive and have extremely specific ESR requirements. ESR-based capacitor screening is the standard first step in CRT equipment repair.
Industrial inverter and variable speed drive maintenance. DC bus filter capacitors in motor drives are high-value electrolytics that degrade with years of ripple current stress. Scheduled ESR testing as part of preventive maintenance identifies capacitor banks approaching end of life before they cause unplanned downtime — a directly cost-justifiable application.
Incoming component inspection. For counterfeit component screening and incoming inspection of electrolytics purchased from non-franchise distributors, ESR measurement combined with capacitance measurement provides a fast check against expected new-condition specifications.
For a deeper reference on electrolytic and other capacitor types, their typical ESR characteristics, and rated parameter specifications across capacitor families, the Capacitor guide at PCBSync provides comprehensive parametric coverage useful for establishing measurement baselines.
Useful Resources for ESR Meter Selection and Capacitor Health Testing
Resource
Description
Link
Peak Electronics Atlas ESR70/ESR80
Dedicated ESR + capacitance meter with technical documentation
Q1: What is ESR and why can’t a regular multimeter measure it?
ESR — equivalent series resistance — is the total internal resistance of a capacitor, measured as a single series element in the component model. It includes lead resistance, electrode resistance, and most significantly in aluminum electrolytics, the ionic resistance of the electrolyte. A regular multimeter measures capacitance by applying a slow charge/discharge cycle — this test is sensitive to capacitance value but not to the resistive component of the impedance that ESR represents. Measuring ESR requires a test signal at a frequency high enough (typically 100kHz) that the capacitive reactance is negligibly small and the dominant measured impedance is the resistive ESR component. This is a different measurement architecture that standard DMMs are not designed to perform.
Q2: Can I use an ESR meter to test capacitors other than electrolytics?
Yes, though the practical value varies by capacitor type. Film capacitors (polypropylene, polyester) have very low ESR and very stable ESR over lifetime — measuring 50mΩ instead of 45mΩ on a film cap is rarely diagnostically significant since film caps rarely fail from ESR degradation. Ceramic MLCCs similarly have stable, low ESR values. The ESR meter is most diagnostically valuable for aluminum electrolytic capacitors because ESR degradation is their primary failure mechanism. For tantalum capacitors, ESR measurement is relevant but should be combined with leakage current testing for complete health assessment.
Q3: My ESR meter reads near zero on some capacitors — is that a fault?
Near-zero ESR readings in-circuit usually indicate a parallel low-resistance path rather than an exceptionally healthy capacitor. Common sources: a transformer winding with low DC resistance in parallel with the filter capacitor, another capacitor in parallel within the same filter bank, or a Schottky diode with very low forward voltage in parallel. Desolder the capacitor and retest — if it reads a reasonable small but non-zero ESR value out of circuit (say 0.1–0.3Ω for a 1000µF type), the in-circuit reading was being pulled down by the parallel path. If it reads near zero out of circuit, the capacitor has an internal short and should be replaced immediately.
Q4: How do I know what ESR value is acceptable for a specific capacitor?
The most accurate reference is the manufacturer’s datasheet impedance specification at 100kHz for the specific part number and value. Most datasheet tables include an “impedance at 100kHz” or “ESR at 100kHz” column. As a practical field guide when datasheets are unavailable, use the reference table in this article combined with the rule of thumb that measured ESR more than 3–5× the expected new-condition value indicates a degraded component warranting replacement. In applications with tight ripple specifications — server power supplies, precision analog rails, high-speed memory power — use a stricter threshold of 2× to proactively replace borderline capacitors before they degrade performance.
Q5: Do I need a dedicated ESR meter or will an LCR meter do the same job?
A quality multi-frequency LCR meter (like the DE-5000 set to 100kHz) measures ESR as accurately or more accurately than most dedicated ESR meters, with the additional capability of simultaneous capacitance measurement and variable frequency. If you already own or are planning to purchase an LCR meter for general component measurement, it covers ESR testing adequately for most applications. A dedicated ESR meter is justified when speed of in-circuit testing is the priority — a dedicated ESR meter powers on, connects, and reads in under five seconds with no configuration. In a repair shop environment where dozens of capacitors are screened per job, that workflow speed advantage accumulates into real time savings over a multi-function LCR meter that requires test frequency configuration.
The ESR Meter Is the Diagnostic Tool That Earns Its Place Every Time It’s Used
The ESR meter is not a specialist instrument for edge-case applications. It is a frontline diagnostic tool for anyone who regularly works with power electronics, consumer equipment repair, audio hardware, industrial drives, or any circuit containing aluminum electrolytic capacitors. The failure mode it detects — ESR degradation in electrolytics — is statistically the most common cause of capacitor-related circuit failure, and it is invisible to every other basic instrument on the bench.
Inquire: Call 0086-755-23203480, or reach out via the form below/your sales contact to discuss our design, manufacturing, and assembly capabilities.
Quote: Email your PCB files to Sales@pcbsync.com (Preferred for large files) or submit online. We will contact you promptly. Please ensure your email is correct.
Notes: For PCB fabrication, we require PCB design file in Gerber RS-274X format (most preferred), *.PCB/DDB (Protel, inform your program version) format or *.BRD (Eagle) format. For PCB assembly, we require PCB design file in above mentioned format, drilling file and BOM. Click to download BOM template To avoid file missing, please include all files into one folder and compress it into .zip or .rar format.


