Inquire: Call 0086-755-23203480, or reach out via the form below/your sales contact to discuss our design, manufacturing, and assembly capabilities.
Quote: Email your PCB files to Sales@pcbsync.com (Preferred for large files) or submit online. We will contact you promptly. Please ensure your email is correct.
Notes: For PCB fabrication, we require PCB design file in Gerber RS-274X format (most preferred), *.PCB/DDB (Protel, inform your program version) format or *.BRD (Eagle) format. For PCB assembly, we require PCB design file in above mentioned format, drilling file and BOM. Click to download BOM template To avoid file missing, please include all files into one folder and compress it into .zip or .rar format.
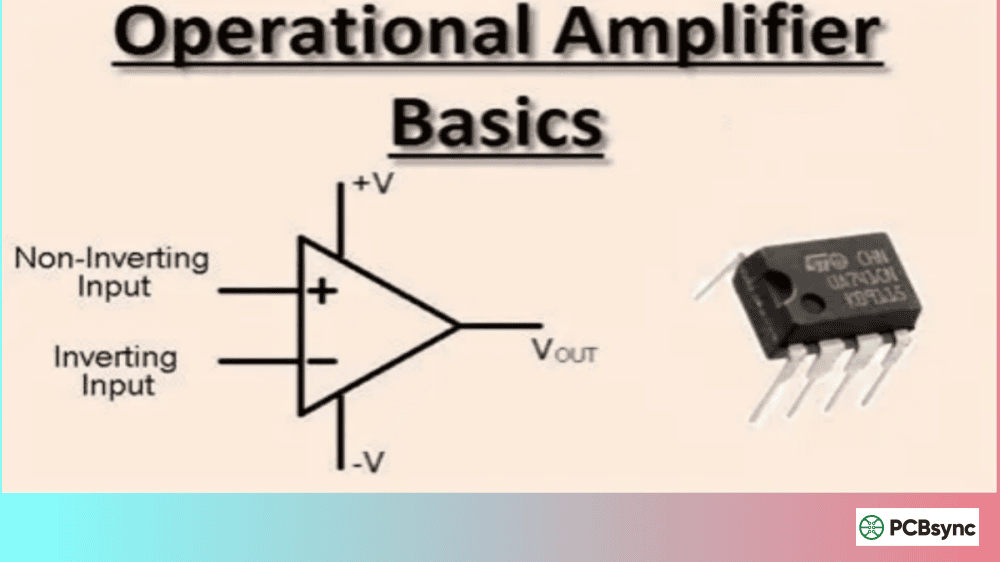
If you’ve spent any time designing analog circuits, you know that operational amplifiers are absolutely everywhere. From the audio preamplifier in your guitar pedal to the sensor conditioning circuit on a medical device, op amp circuits form the backbone of analog signal processing. I’ve been designing PCBs for over a decade, and I can tell you that mastering these ten configurations will cover probably 90% of the op-amp applications you’ll encounter in real-world projects.
The beauty of op-amps lies in their versatility. With just a handful of external resistors and capacitors, you can build amplifiers, filters, comparators, oscillators, and mathematical function blocks. In this guide, I’ll walk you through ten essential op-amp circuits that every engineer should have in their toolkit, complete with practical design tips and the formulas you’ll actually use.
Before we dive into each circuit, let me explain why I selected these particular configurations. These aren’t just academic exercises; they’re the circuits I reach for again and again in production designs. Whether you’re conditioning a sensor signal, driving an ADC, mixing audio signals, or building a power supply monitor, these circuits deliver reliable, predictable results.
Circuit Type
Primary Function
Key Applications
Voltage Follower
Impedance buffering
Sensor interfacing, stage isolation
Inverting Amplifier
Signal amplification with inversion
Audio, instrumentation
Non-Inverting Amplifier
Signal amplification without inversion
Sensor conditioning, ADC drivers
Summing Amplifier
Add multiple signals
Audio mixing, DAC outputs
Differential Amplifier
Amplify voltage difference
Bridge sensors, noise rejection
Integrator
Mathematical integration
Ramp generation, PID controllers
Differentiator
Rate of change detection
Edge detection, frequency analysis
Comparator
Voltage comparison
Level detection, square wave generation
Instrumentation Amplifier
Precision differential amplification
Medical, precision measurement
Active Filter
Frequency-selective amplification
Anti-aliasing, audio equalization
Op Amp Circuit Fundamentals to Remember
Before we examine each configuration, let’s review the two golden rules that make op-amp analysis manageable. Assuming negative feedback and the op-amp operating within its linear region:
Rule 1: No current flows into the op-amp inputs (infinite input impedance)
Rule 2: The op-amp adjusts its output to make both inputs equal (virtual short)
These rules vastly simplify circuit analysis and allow you to quickly derive gain equations for almost any op-amp configuration.
1. Voltage Follower (Unity Gain Buffer)
The voltage follower is the simplest op-amp circuit you can build. It requires no external components other than the op-amp itself, and its gain is exactly 1. So why bother?
How It Works
The output connects directly to the inverting input, creating 100% negative feedback. Since the op-amp forces both inputs to be equal, and the non-inverting input receives the input signal, the output exactly follows the input.
Gain Formula: Av = 1
Voltage Follower Specifications
Parameter
Typical Value
Voltage Gain
1 (0 dB)
Input Impedance
Very High (MΩ to GΩ)
Output Impedance
Very Low (<100Ω)
Phase Shift
0°
Practical Applications
The voltage follower’s real power is impedance transformation. Consider this scenario: you have a resistive sensor connected through a voltage divider. If you connect a low-impedance load directly, the loading effect will mess up your carefully calculated voltage ratio. Insert a voltage follower between the divider and the load, and problem solved.
I use voltage followers extensively when interfacing high-impedance sources like piezoelectric sensors or pH probes with ADC inputs. They’re also essential for driving long cables without signal degradation.
Pro Tip: Don’t forget that even though the voltage gain is 1, the current-driving capability improves dramatically. That’s often exactly what you need.
2. Inverting Amplifier Circuit
The inverting amplifier is probably the most commonly taught op-amp configuration, and for good reason. It’s simple to analyze, provides predictable gain, and works reliably in countless applications.
Circuit Operation
The input signal connects to the inverting input through an input resistor (Rin). A feedback resistor (Rf) connects the output back to the inverting input. The non-inverting input is grounded.
Gain Formula: Av = -Rf / Rin
The negative sign indicates that the output is 180° out of phase with the input.
Inverting Amplifier Design Parameters
Component
Effect on Circuit
Rf (feedback resistor)
Higher Rf = higher gain
Rin (input resistor)
Determines input impedance
Rf/Rin ratio
Sets voltage gain
Design Considerations
The input impedance of an inverting amplifier equals Rin, which is often its main limitation. If your source has significant output impedance, this will affect your gain calculation. For high-impedance sources, you might need a buffer stage first.
One common mistake I see is forgetting that high-value resistors can introduce noise. Try to keep resistor values between 1kΩ and 100kΩ for most applications. If you need higher gain, consider cascading stages rather than using extremely high resistance values.
When integrating op-amp circuits into complex systems—particularly those involving digital signal processing with FPGAs like the Altera FPGA series—proper level shifting and impedance matching become critical for clean signal acquisition.
3. Non-Inverting Amplifier Circuit
When you can’t tolerate phase inversion, or when you need very high input impedance, the non-inverting amplifier is your go-to choice.
How the Circuit Works
The input signal connects directly to the non-inverting input. A voltage divider made of Rf and R1 connects between the output and ground, with the junction feeding back to the inverting input.
Gain Formula: Av = 1 + (Rf / R1)
Notice that the minimum gain is always 1 (when Rf = 0), so you cannot make a non-inverting attenuator using this configuration.
Non-Inverting vs Inverting Comparison
Feature
Inverting
Non-Inverting
Input Impedance
Rin
Very High
Phase Shift
180°
0°
Minimum Gain
0 (attenuator possible)
1
Virtual Ground
Yes
No
Why Choose Non-Inverting?
The non-inverting amplifier’s input impedance is essentially the op-amp’s input impedance, which can be gigaohms for FET-input devices. This makes it perfect for buffering high-impedance sensors without loading them.
I frequently use non-inverting amplifiers in sensor conditioning circuits where maintaining signal phase is important, such as in feedback control systems where an accidental 180° phase shift could cause oscillation.
4. Summing Amplifier Circuit
Need to combine multiple signals into one? The summing amplifier, also called an adder circuit, does exactly that. It’s the foundation of audio mixers and is used extensively in analog computing.
Inverting Summing Amplifier
The inverting summer is more popular because you can add any number of inputs without changing resistor values. Each input connects to the inverting input through its own input resistor.
If all input resistors are equal (R1 = R2 = R3 = R), the formula simplifies to:
Vout = -(Rf/R) × (V1 + V2 + V3 + …)
Summing Amplifier Applications
Application
Configuration Details
Audio Mixer
Equal input resistors, adjustable Rf
DAC Output Stage
Binary-weighted input resistors
Weighted Summer
Different resistor values for scaling
Averaging Amplifier
Rf = R/n (where n = number of inputs)
Practical Design Notes
One thing I always keep in mind is that the virtual ground at the inverting input means all inputs are effectively isolated from each other. This prevents interaction between input sources, which is crucial in audio mixing applications.
For a clean audio mixer, use 1% tolerance metal film resistors and consider adding input coupling capacitors to block DC from each source.
5. Differential Amplifier Circuit
The differential amplifier amplifies the difference between two input signals while rejecting any signal common to both inputs. This common-mode rejection is essential for dealing with noise.
Basic Differential Amplifier
Using a single op-amp with four resistors, you can build a basic difference amplifier. When R1 = R2 and Rf = Rg, the output is:
Vout = (Rf/R1) × (V2 – V1)
Differential Amplifier Performance
Parameter
Ideal Value
Practical Consideration
CMRR
Infinite
Limited by resistor matching
Input Impedance
Equal on both inputs
May need buffers
Gain Accuracy
Perfect
Depends on resistor tolerance
Limitations and Solutions
The single op-amp differential amplifier has a significant limitation: its input impedances aren’t equal or particularly high. If your source impedances aren’t matched, you’ll degrade CMRR.
For applications requiring better performance, consider the instrumentation amplifier configuration discussed later in this article. For the basic differential amplifier, use 0.1% precision resistors if you need good common-mode rejection.
6. Op-Amp Integrator Circuit
The integrator produces an output proportional to the integral of the input signal over time. It’s fundamental to analog computers, ramp generators, and control systems.
Integrator Circuit Design
Replace the feedback resistor in an inverting amplifier with a capacitor, and you have an integrator. The output voltage is:
Vout = -(1/RC) × ∫Vin dt
For a constant input voltage Vin, the output ramps linearly:
Vout = -(Vin × t) / RC
Integrator Component Selection
Component
Selection Guidelines
Capacitor (C)
Low leakage, film or ceramic preferred
Resistor (R)
Sets time constant with C
Reset Switch
Parallel with C to reset integrator
Bleed Resistor
Large value parallel with C for DC stability
Practical Issues with Integrators
Pure integrators have a problem: any DC offset at the input, no matter how small, will cause the output to drift toward saturation over time. The solution is to add a high-value resistor (10 to 100 times R) in parallel with the integrator capacitor. This limits the DC gain while maintaining good integration at higher frequencies.
In control systems, I typically use integrators as part of PID controllers, where the proportional and derivative terms provide overall stability while the integrator eliminates steady-state error.
7. Op-Amp Differentiator Circuit
The differentiator outputs a voltage proportional to the rate of change of the input signal. It’s the mathematical complement to the integrator.
Differentiator Configuration
Swap the resistor and capacitor positions from the integrator, and you get a differentiator. The output is:
Vout = -RC × (dVin/dt)
Differentiator Characteristics
Input Signal
Output Response
DC
Zero
Ramp
Constant voltage
Triangle
Square wave
Sine wave
Cosine wave (phase shifted)
Why Differentiators Are Tricky
Here’s the challenge with differentiators: they amplify high frequencies. This means they’ll also amplify high-frequency noise, potentially causing oscillation or output noise that swamps the desired signal.
The solution is to limit the high-frequency gain by adding a resistor in series with the input capacitor and a small capacitor in parallel with the feedback resistor. This creates a “practical differentiator” that still performs differentiation over the frequency range of interest while remaining stable.
I use differentiators in rate-of-change monitoring applications, such as detecting rapid temperature changes in thermal protection circuits.
8. Op-Amp Comparator Circuit
While dedicated comparator ICs exist, op-amps can serve as comparators in many applications. The comparator compares two voltages and outputs a high or low level depending on which input is greater.
Basic Comparator Operation
With no feedback, the op-amp’s very high open-loop gain means even a small voltage difference between inputs will drive the output to saturation. If V+ > V-, the output goes to positive saturation (near V+). If V+ < V-, the output goes to negative saturation (near V-).
Adding Hysteresis (Schmitt Trigger)
For noisy inputs or slowly changing signals, a simple comparator can produce multiple transitions or “chatter.” The solution is hysteresis, implemented with positive feedback:
Op-amps designed for linear operation aren’t optimized for switching between rails. For high-speed or precision threshold detection, dedicated comparators like the LM311 or LM339 offer faster switching, better-defined output stages (often open-collector), and are designed for no-feedback operation.
9. Instrumentation Amplifier Circuit
When you need precision differential amplification with high input impedance and excellent CMRR, the instrumentation amplifier (in-amp) is the answer. It’s the go-to circuit for sensor interfaces in medical, industrial, and scientific applications.
Three Op-Amp Instrumentation Amplifier
The classic in-amp uses three op-amps: two input buffers and one difference amplifier. A single gain-setting resistor (RG) between the two buffer stages sets the overall gain:
Gain Formula: Av = 1 + (2R/RG)
Instrumentation Amplifier Advantages
Advantage
Technical Reason
High Input Impedance
Both inputs buffered by non-inverting amplifiers
High CMRR
Precision matching + common-mode gain of 1 at input stage
Single Resistor Gain Control
RG doesn’t need to be matched
Low Output Impedance
Output stage drives loads directly
Discrete vs Integrated In-Amps
You can build an instrumentation amplifier from three separate op-amps, but integrated solutions like the INA128, AD620, or INA333 offer much better performance because the internal resistors are laser-trimmed for matching.
For bridge sensor applications—strain gauges, load cells, pressure sensors—an integrated in-amp saves board space and provides performance that’s nearly impossible to achieve with discrete components.
10. Active Filter Circuits
Active filters use op-amps combined with resistors and capacitors to create frequency-selective circuits. Unlike passive RC filters, active filters can provide gain and sharp roll-off without using inductors.
Common Active Filter Types
Filter Type
Function
Typical Use
Low-Pass
Passes frequencies below cutoff
Anti-aliasing before ADC
High-Pass
Passes frequencies above cutoff
DC blocking, rumble removal
Band-Pass
Passes frequencies within a range
Tone detection, radio IF
Band-Stop (Notch)
Blocks frequencies within a range
50/60Hz rejection
Sallen-Key Low-Pass Filter
The Sallen-Key topology is popular for second-order filters. With equal resistors (R) and equal capacitors (C):
Cutoff Frequency: fc = 1 / (2π × R × C)
For a Butterworth (maximally flat) response, the gain should be set to 1.586.
Filter Design Parameters
Parameter
What It Means
Cutoff Frequency (fc)
-3dB point of the response
Order
Number of poles; determines roll-off steepness
Q Factor
Affects peaking near cutoff
Pass Band Ripple
Variation in gain within pass band
Butterworth vs Chebyshev vs Bessel
Choose your filter type based on what matters most:
Butterworth: Maximally flat passband, good all-around choice
Chebyshev: Steeper roll-off but with passband ripple
Bessel: Best phase response, preserves waveform shape
For anti-aliasing filters before an ADC, Butterworth is usually the best balance. For audio crossovers where phase matters, Bessel filters preserve transient response.
While not in the original ten, the transimpedance amplifier deserves mention because it’s essential for photodiode interfaces and any application requiring current-to-voltage conversion.
Transimpedance Configuration
The current source (like a photodiode) connects to the inverting input, which is held at virtual ground. A feedback resistor (Rf) converts the current to voltage:
Vout = -Iin × Rf
Transimpedance Amplifier Stability
Photodiodes have significant junction capacitance, which can cause oscillation. A small feedback capacitor (Cf) parallel to Rf stabilizes the circuit:
Recommended Cf: Start with a value that creates a pole at about the unity-gain frequency of the op-amp
For low-light applications requiring high gain (large Rf), use a FET-input op-amp with low bias current to minimize offset.
Selecting the Right Op-Amp for Your Circuit
The best circuit design can be ruined by choosing the wrong op-amp. Here’s a quick guide to matching op-amp parameters to circuit requirements:
Op-Amp Selection Criteria by Application
Application
Key Parameters
Recommended Op-Amp Types
Precision DC
Low Vos, low drift
OPA277, AD8676, LTC2050
High-Speed
High GBW, high slew rate
LM318, OPA656, AD8065
Low Noise
Low en, low in
OPA227, AD797, LT1028
Low Power
Low Iq, rail-to-rail
LMV321, MCP6001, TLV9001
Single Supply
Rail-to-rail I/O
LM358, MCP6002, OPA344
Common Design Mistakes to Avoid
After reviewing countless op-amp circuits (including my own early disasters), here are the mistakes I see most often:
1. Forgetting bypass capacitors: Every op-amp needs a 0.1µF ceramic capacitor between each supply pin and ground, placed as close as possible to the IC.
2. High-impedance nodes without protection: A 10MΩ feedback resistor combined with stray capacitance creates a noise antenna. Consider guarding techniques or shielding.
3. Ignoring gain-bandwidth product: If your op-amp has a 1MHz GBW and you set the gain to 100, your bandwidth is only 10kHz. Plan accordingly.
4. Not accounting for input bias current: In high-impedance circuits, bias current through source resistance creates offset voltage. Add a compensating resistor when needed.
5. Single-supply headroom issues: Many op-amps can’t swing to the rails. Make sure your signal has adequate headroom above ground and below the supply.
Useful Resources for Op-Amp Design
Manufacturer Documentation
Resource
URL
Content
Texas Instruments
ti.com/opamps
Datasheets, design guides, TINA-TI
Analog Devices
analog.com
Application notes, reference designs
Microchip/Microchip
microchip.com
Low-power op-amp solutions
ON Semiconductor
onsemi.com
Audio and general purpose op-amps
Design Tools
TINA-TI: Free SPICE simulator from Texas Instruments with extensive component library
LTspice: Free simulator from Analog Devices with excellent op-amp models
FilterPro (TI): Active filter design software
Analog Filter Wizard (ADI): Web-based filter design tool
“IC Op-Amp Cookbook” by Walter Jung – Classic comprehensive guide
“Photodiode Amplifiers: Op Amp Solutions” by Jerald Graeme – Essential for transimpedance design
FAQs About Op Amp Circuits
Can I use any op-amp for any of these circuits?
Technically yes, but performance varies dramatically. A general-purpose op-amp like the LM741 will work for basic demonstrations, but for production designs, match the op-amp specifications to your requirements. Consider parameters like gain-bandwidth product, input offset voltage, bias current, noise, and supply voltage range.
Why does my op-amp circuit oscillate?
Oscillation usually indicates insufficient phase margin. Common causes include capacitive loading on the output, high source impedance, or operating near the op-amp’s unity-gain frequency with significant phase shift. Solutions include adding a small feedback capacitor, using a series output resistor, or choosing an op-amp specifically designed for the application.
What’s the difference between an op-amp used as a comparator and a dedicated comparator?
Op-amps are designed for linear operation with negative feedback and include internal compensation that limits switching speed. Dedicated comparators have push-pull or open-collector outputs designed for fast switching, no internal compensation (since they don’t need it), and often include hysteresis or latch inputs. For high-speed or precision threshold detection, always use a dedicated comparator.
How do I choose between inverting and non-inverting amplifier configurations?
Use non-inverting when you need very high input impedance or when phase preservation matters. Use inverting when you need a virtual ground at the input, want to sum signals, or need gain less than 1 (attenuation). The inverting configuration also allows gain of zero, which the non-inverting cannot achieve.
Can I cascade multiple op-amp stages?
Absolutely, and it’s often the best approach for achieving high gain or complex transfer functions. Each stage provides additional filtering, and keeping individual stage gains moderate improves overall bandwidth. Just ensure that each stage’s output can drive the next stage’s input without loading issues, and watch your power supply headroom.
PCB Layout Tips for Op-Amp Circuits
Good schematic design means nothing if your PCB layout introduces problems. Here are the layout practices I follow for reliable op-amp circuits:
Power Supply Considerations
Layout Element
Best Practice
Bypass Capacitors
Place within 5mm of supply pins
Ground Plane
Solid, unbroken under analog sections
Power Traces
Wide traces, star or point-to-ground for sensitive circuits
Digital Isolation
Keep digital switching noise away from analog sections
Signal Integrity Guidelines
For precision circuits, keep high-impedance nodes short and use guard traces. A guard trace is a driven shield at the same potential as the node being protected, which eliminates leakage currents from adjacent traces.
In transimpedance amplifiers, minimize the area of the feedback loop to reduce noise pickup. Route the feedback resistor directly across the op-amp package if possible.
For high-frequency circuits, remember that even short traces have inductance. Keep trace lengths equal for differential signals, and consider controlled-impedance routing if your signal bandwidth exceeds 10MHz.
Thermal Management
High-current op-amps (audio power amps, for example) need thermal relief. Use thermal vias under the device and provide adequate copper area for heat spreading. Check the datasheet’s thermal resistance specifications and calculate your expected junction temperature.
Understanding Op-Amp Specifications Deep Dive
Selecting the right op-amp requires understanding key datasheet parameters. Let me walk through the specifications that matter most for circuit design.
DC Parameters
Input Offset Voltage (Vos): The voltage needed between inputs to force zero output. For precision circuits, look for op-amps with µV-level offset. Auto-zero or chopper-stabilized op-amps like the LTC2050 offer exceptional offset performance.
Input Bias Current (Ib): Current flowing into (or out of) the input terminals. For CMOS op-amps, this is typically picoamps, but bipolar op-amps can have nanoamp to microamp levels. This current creates voltage drops across source resistances.
Input Offset Current (Ios): The difference between the two input bias currents. This matters when source impedances aren’t equal, as it creates differential offset.
AC Parameters
Gain Bandwidth Product (GBW): The product of gain and bandwidth is approximately constant. A 1MHz GBW op-amp at gain of 10 has about 100kHz bandwidth.
Slew Rate: Maximum rate of change of the output voltage. If your signal frequency and amplitude require faster slewing than the op-amp can provide, you’ll see distortion. Calculate required slew rate as 2πfVpeak.
Phase Margin: Indicates stability with feedback. Values above 45° are generally stable; 60° or more is preferred.
Key Specifications Summary Table
Parameter
General Purpose
Precision
High Speed
Vos
1-5 mV
<100 µV
1-10 mV
GBW
1-10 MHz
100 kHz – 1 MHz
100+ MHz
Slew Rate
0.5-5 V/µs
0.1-1 V/µs
100+ V/µs
Ib
20-500 nA
10-100 pA (FET)
1-50 µA
Noise (en)
10-50 nV/√Hz
3-10 nV/√Hz
2-20 nV/√Hz
Real-World Application Examples
Let me share some practical op-amp applications from actual projects to illustrate how these circuits work together.
Example 1: Temperature Measurement System
For monitoring temperature in an industrial controller, I designed a signal chain starting with a thermocouple. The millivolt-level thermocouple signal went through:
Instrumentation amplifier (INA128) with gain of 100
Active low-pass filter (2nd-order Sallen-Key, fc = 10Hz) to remove 50/60Hz interference
Voltage follower to drive the ADC input
The in-amp provided high CMRR to reject ground loop noise, the filter removed power line interference, and the buffer ensured the ADC saw a low-impedance source.
Example 2: Audio Mixer Design
A four-channel audio mixer used the following architecture:
Four non-inverting amplifiers as input buffers with adjustable gain
Inverting summing amplifier to combine all channels
Unity gain inverter to restore correct phase
Active band-pass filter for tone control (adjustable with potentiometers)
The key insight was using the summing amplifier in inverting mode, which allowed adding an unlimited number of channels without recalculating resistor values.
Example 3: Photodiode Light Meter
A light intensity meter used:
Transimpedance amplifier with 1MΩ feedback resistor
Logarithmic amplifier stage for extended dynamic range
Active low-pass filter to smooth the output
Non-inverting amplifier to scale for ADC full-scale
The logarithmic stage was critical because light intensity varies over several orders of magnitude, and a log response matched human perception better than a linear response.
Troubleshooting Op-Amp Circuits
When your circuit doesn’t work, systematic troubleshooting saves hours of frustration. Here’s my approach:
Common Problems and Solutions
Symptom
Likely Cause
Solution
Output stuck at rail
Open feedback, saturation
Check feedback path, reduce gain
Oscillation
Insufficient phase margin
Add compensation capacitor
Noisy output
High-impedance pickup
Shield input, reduce resistance
Offset error
Bias current, component mismatch
Add compensation resistor
Clipping
Signal exceeds headroom
Reduce gain, increase supply
Slow response
Slew rate limiting
Use faster op-amp
Step-by-Step Debugging Process
Step 1: Verify power supply voltages at the op-amp pins (not just the source)
Step 2: Check that bypass capacitors are present and properly connected
Step 3: Measure DC operating points at all nodes
Step 4: Apply a simple DC or low-frequency signal and trace through the circuit
Step 5: Use an oscilloscope to look for oscillation or noise
Step 6: Temporarily reduce gain to see if the circuit works at lower performance
When All Else Fails
Sometimes the issue is a fundamental design problem. Go back to simulation and compare measured results to simulated behavior. If simulation works but hardware doesn’t, focus on layout issues, component tolerances, or thermal effects.
Conclusion
These ten op amp circuits represent the foundation of analog circuit design. Master them, and you’ll have the tools to tackle everything from simple sensor interfaces to complex signal processing chains. The key is understanding not just the gain equations but the practical considerations: when to use each topology, what limitations to watch for, and how component selection affects performance.
Throughout this guide, we’ve covered the essential op-amp configurations—from simple voltage followers and inverting amplifiers to sophisticated instrumentation amplifiers and active filters. Each circuit has its strengths and ideal applications, and knowing when to use which configuration is as important as understanding how they work.
Remember that op-amp applications extend far beyond these basic configurations. As you combine and modify these building blocks, you’ll discover solutions to problems you haven’t even encountered yet. Start with simulation (LTspice is free and excellent), breadboard your designs to verify operation, and always check the actual performance against your calculations.
The operational amplifier remains one of the most powerful tools in an engineer’s arsenal. Whether you’re designing audio equipment, sensor interfaces, control systems, or signal processing chains, these ten circuits will serve you well. Keep this guide handy as a reference, and don’t be afraid to experiment—that’s how real learning happens.
With these ten circuits in your toolkit, you’re well-equipped to handle the analog challenges that come your way. The next time you face a signal conditioning problem, an amplification requirement, or a filtering need, you’ll know exactly which op-amp configuration to reach for.
Inquire: Call 0086-755-23203480, or reach out via the form below/your sales contact to discuss our design, manufacturing, and assembly capabilities.
Quote: Email your PCB files to Sales@pcbsync.com (Preferred for large files) or submit online. We will contact you promptly. Please ensure your email is correct.
Notes: For PCB fabrication, we require PCB design file in Gerber RS-274X format (most preferred), *.PCB/DDB (Protel, inform your program version) format or *.BRD (Eagle) format. For PCB assembly, we require PCB design file in above mentioned format, drilling file and BOM. Click to download BOM template To avoid file missing, please include all files into one folder and compress it into .zip or .rar format.


