Inquire: Call 0086-755-23203480, or reach out via the form below/your sales contact to discuss our design, manufacturing, and assembly capabilities.
Quote: Email your PCB files to Sales@pcbsync.com (Preferred for large files) or submit online. We will contact you promptly. Please ensure your email is correct.
Notes: For PCB fabrication, we require PCB design file in Gerber RS-274X format (most preferred), *.PCB/DDB (Protel, inform your program version) format or *.BRD (Eagle) format. For PCB assembly, we require PCB design file in above mentioned format, drilling file and BOM. Click to download BOM template To avoid file missing, please include all files into one folder and compress it into .zip or .rar format.
Designing a 2.4 GHz PCB antenna that actually works can be frustrating. I’ve seen engineers spend weeks tweaking dimensions, adjusting matching networks, and wondering why their wireless range is half what they expected. The problem usually isn’t the antenna type—it’s the implementation details that most guides skip over.
This guide covers everything you need to design a working 2.4 GHz PCB antenna: the calculations, actual dimensions you can copy, ground plane requirements, and the layout mistakes that kill performance. Whether you’re building an ESP32 project, a Bluetooth device, or a commercial IoT product, these principles apply.
A 2.4 GHz PCB antenna is an antenna structure etched directly onto a printed circuit board, designed to operate in the 2.4 GHz ISM (Industrial, Scientific, and Medical) band. This frequency range spans 2.400 GHz to 2.4835 GHz and is used by WiFi, Bluetooth, Zigbee, and countless IoT protocols.
Instead of using an external antenna or a separate chip antenna, a PCB antenna is simply a copper trace pattern on your board. The antenna becomes part of the PCB itself—no additional components, no assembly cost, and consistent performance across production runs.
Why Choose a PCB Antenna Over Other Options?
Antenna Type
Cost
Size
Performance
Ease of Tuning
PCB Antenna
Essentially free
Medium
Good
Moderate
Chip Antenna
$0.10–$0.50
Small
Good
Difficult
Wire Antenna
Very low
Large
Excellent
Easy
External Antenna
$1–$10+
Variable
Excellent
Easy
For most applications, PCB antennas offer the best balance. They’re free (already part of your board), repeatable across production, and provide adequate range for typical wireless applications. The tradeoff is that they require more board space than chip antennas and more design effort upfront.
Understanding Wavelength and Antenna Length
Before jumping into specific designs, you need to understand the fundamental relationship between frequency and antenna length. This determines everything else.
Quarter-Wavelength Calculation for 2.4 GHz
The wavelength (λ) of any electromagnetic wave is calculated as:
λ = c / f
Where:
c = speed of light (3 × 10⁸ m/s)
f = frequency (2.45 × 10⁹ Hz for center of 2.4 GHz band)
λ = 3 × 10⁸ / 2.45 × 10⁹ = 122.4 mm (in free space)
Most PCB antennas are quarter-wavelength (λ/4) designs:
λ/4 = 122.4 / 4 = 30.6 mm (in free space)
The FR4 Dielectric Effect
Here’s what most tutorials forget: your antenna isn’t in free space. It’s on FR4 substrate, which has a dielectric constant (εr) of approximately 4.4. This slows down the electromagnetic wave and shortens the effective wavelength.
The effective wavelength on FR4 is approximately:
λeff = λ / √εr = 122.4 / √4.4 ≈ 58.3 mm
λeff/4 ≈ 14.6 mm
In practice, most 2.4 GHz PCB antennas have physical lengths between 15–31 mm depending on the antenna type, substrate thickness, and trace geometry. The exact length requires simulation or empirical tuning.
Types of 2.4 GHz PCB Antennas
Several antenna topologies work well at 2.4 GHz. Each has tradeoffs in size, performance, and ease of implementation.
Inverted-F Antenna (IFA)
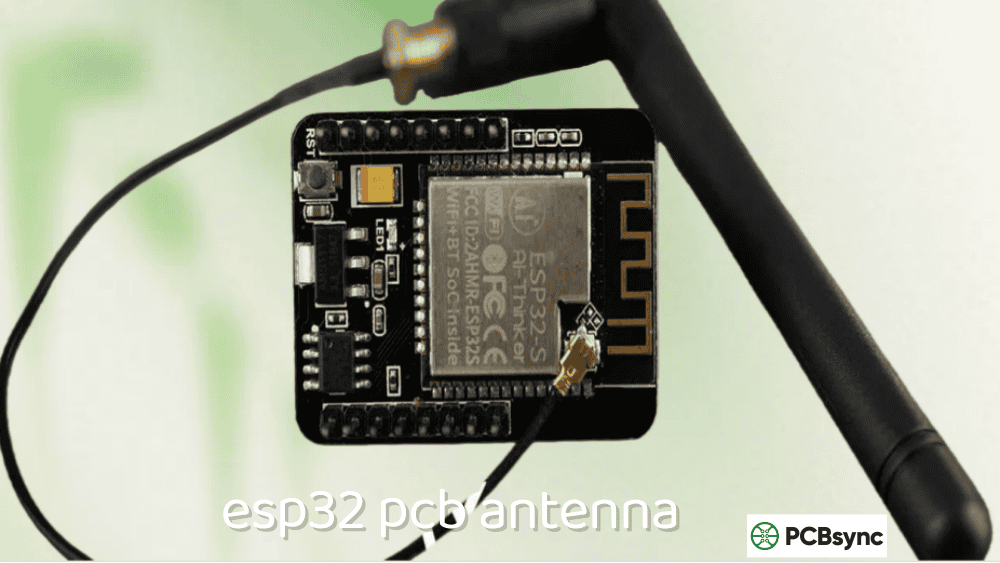
The Inverted-F Antenna is the most popular choice for 2.4 GHz applications. You’ve seen it on every ESP8266 and ESP32 module—that meandering trace at the edge of the board.
Characteristics:
Compact footprint (typically 4mm × 20mm)
Inherently matched to 50Ω without external components
Good omnidirectional pattern
Easy to integrate at PCB edge
Typical IFA Dimensions for 2.4 GHz (1.6mm FR4):
Parameter
Dimension
Total length (radiating element)
15.2–20.5 mm
Feed arm width
0.5–1.0 mm
Shorting arm width
0.5–1.0 mm
Height above ground
4–5 mm
Ground clearance
0.5–1.0 mm
Meandered Inverted-F Antenna (MIFA)
The MIFA is a compact version of the IFA where the radiating element is folded back and forth (meandered) to fit in a smaller space. This is exactly what the ESP32 uses.
Characteristics:
Very compact (as small as 3mm × 15mm)
Slightly lower efficiency than straight IFA
Requires careful tuning
Sensitive to ground plane size
Typical MIFA Dimensions for 2.4 GHz (1.6mm FR4):
Parameter
Dimension
Overall footprint
3–5 mm × 12–18 mm
Trace width
0.5–1.0 mm
Meander spacing
0.5–1.0 mm
Number of meanders
3–6
Planar Inverted-F Antenna (PIFA)
The PIFA uses a planar radiating element (a patch) instead of a wire trace. It offers better bandwidth than the IFA but requires more board area.
Characteristics:
Wider bandwidth than IFA
Lower profile possible
Larger footprint
Better for dual-band designs
Meander Line Monopole
A simple meander monopole folds a quarter-wave element into a compact zig-zag pattern. It’s straightforward to design but requires a matching network.
Characteristics:
Simple geometry
Compact length
Usually needs impedance matching
Moderate efficiency
Comparison Table: 2.4 GHz PCB Antenna Types
Antenna Type
Footprint
Bandwidth
Efficiency
Matching Required
Best For
IFA
4×20 mm
200–250 MHz
70–80%
Usually no
General purpose
MIFA
3×15 mm
150–200 MHz
60–75%
Sometimes
Space-constrained
PIFA
8×15 mm
250–400 MHz
75–85%
Usually no
Wideband/dual-band
Meander Monopole
3×25 mm
100–150 MHz
65–75%
Yes
Simple designs
Ground Plane Design Guidelines
The ground plane is half your antenna. I can’t stress this enough—I’ve seen more antenna failures from bad ground planes than from bad antenna traces.
Minimum Ground Plane Size
The ground plane acts as a mirror for quarter-wavelength antennas, effectively creating a half-wave dipole. Too small, and your antenna won’t radiate efficiently.
Application
Minimum Ground Plane Size
Recommended Size
USB dongle
15 × 30 mm
20 × 40 mm
IoT sensor node
20 × 30 mm
25 × 40 mm
Wearable device
15 × 25 mm
20 × 35 mm
General purpose
25 × 35 mm
30 × 50 mm
Critical Ground Plane Rules
Rule 1: No ground under the antenna
This is the most common mistake. There must be NO copper (ground or signal) directly beneath the antenna radiating element. The clearance area should extend at least 1–2 mm beyond the antenna footprint.
Rule 2: Solid ground on adjacent layers
Layer 2 (or the layer immediately below the antenna) should have solid, uninterrupted ground in the antenna feed region. Use via stitching along the ground edge to ensure good RF continuity.
Rule 3: Ground plane edge matters
Surface currents flow along the ground plane edge. The edge nearest the antenna significantly affects performance. Keep this edge straight and clean—no notches or irregular shapes within λ/10 (about 5mm) of the antenna.
Rule 4: Via stitching
Place ground vias along the perimeter of the ground plane, especially near the antenna. Spacing should be less than λ/20 (approximately 2.5mm at 2.4 GHz) to prevent slot radiation.
The trace connecting your RF chip to the antenna is a transmission line. It must be designed for 50Ω characteristic impedance to prevent reflections and power loss.
Modern WiFi devices often need both 2.4 GHz and 5 GHz coverage. While this guide focuses on 2.4 GHz, here are key considerations for dual-band designs:
PIFA for Dual-Band Operation
The Planar Inverted-F Antenna can be designed for dual-band operation by adding slots or parasitic elements. The main patch resonates at 2.4 GHz while a slot or secondary element handles 5 GHz.
Dual-band PIFA characteristics:
Larger footprint than single-band (typically 10 × 25 mm)
More complex matching requirements
Better to use two separate antennas for optimal performance
When to Use Two Separate Antennas
For demanding applications, separate 2.4 GHz and 5 GHz antennas often outperform dual-band designs:
Approach
Footprint
Performance
Complexity
Single dual-band antenna
Smaller
Compromised
High
Two separate antennas
Larger
Optimal
Lower
Chip antenna + PCB antenna
Medium
Good
Medium
Manufacturing Considerations
Your antenna design must survive the PCB manufacturing process without degradation.
PCB Fabrication Tolerances
Standard PCB fabrication has tolerances that affect antenna performance:
Parameter
Typical Tolerance
Effect on Antenna
Trace width
±10-15%
Shifts impedance
Dielectric thickness
±10%
Changes resonant frequency
Dielectric constant
±5% (FR4)
Changes resonant frequency
Copper thickness
±10%
Minor effect
Design for manufacturing:
Use wider traces (0.5mm minimum) for better consistency
Specify controlled dielectric if frequency accuracy is critical
Include tuning range in matching network
Solder Mask Considerations
Solder mask over the antenna trace adds a dielectric layer that affects performance:
Solder mask εr ≈ 3.5–4.0
Shifts resonance down slightly (1–3%)
Some designs intentionally leave antenna traces bare
For maximum consistency, either always include solder mask on the antenna or always exclude it—don’t leave it to manufacturing variation.
Troubleshooting Poor Antenna Performance
After reviewing hundreds of designs, these are the errors I see repeatedly:
Mistake 1: Ground Plane Under Antenna
Problem: Copper pour extends under the antenna radiating element. Result: Antenna acts as transmission line, not radiator. Severe detuning. Fix: Create explicit keep-out zone. Add note to silkscreen.
Mistake 2: Insufficient Ground Plane
Problem: Ground plane is too small or has large cutouts. Result: Poor efficiency, unpredictable radiation pattern, impedance mismatch. Fix: Maintain minimum 25×35mm ground area. Fill unused board area with ground.
Mistake 3: Wrong Feed Line Impedance
Problem: Feed trace width doesn’t match 50Ω for the stackup. Result: Reflections, reduced power transfer, degraded range. Fix: Calculate proper trace width using impedance calculator. Verify with TDR if available.
Mistake 4: Components Near Antenna
Problem: Decoupling capacitors, crystals, or ICs placed within antenna keep-out zone. Result: Detuning, reduced efficiency, pattern distortion. Fix: Keep minimum 5mm clearance from antenna to any component.
Mistake 5: Ignoring Enclosure Effects
Problem: Antenna tuned in free space but used in plastic enclosure. Result: Frequency shifts down 50–100 MHz. Return loss degrades. Fix: Always tune antenna in final enclosure. Plastic increases effective capacitance.
Testing Your 2.4 GHz PCB Antenna
Professional antenna testing requires specialized equipment, but you can get meaningful results with more accessible tools.
S11 (Return Loss) Measurement
The primary metric is S11, which indicates how much power is reflected back from the antenna. Target values:
S11 Value
Return Loss
Power Reflected
Acceptable?
-6 dB
6 dB
25%
Marginal
-10 dB
10 dB
10%
Good
-15 dB
15 dB
3%
Excellent
-20 dB
20 dB
1%
Overkill
Goal: S11 ≤ -10 dB across 2.4–2.48 GHz.
Using a NanoVNA for Antenna Testing
The NanoVNA (and NanoVNA-H) has made antenna testing accessible to hobbyists and small companies. For 2.4 GHz work:
Calibrate carefully – Use a quality calibration kit. Poor calibration ruins measurements.
Use proper connectors – SMA or U.FL to your antenna feed point. Avoid adapters if possible.
Set frequency span – 2.0–3.0 GHz to see the full response
Check resonant frequency – The dip in S11 shows where the antenna resonates
Verify bandwidth – Width of the region below -10 dB
NanoVNA measurement tips:
Let the device warm up for 10 minutes before calibrating
Use short, quality coax cables
Measure antenna in intended orientation (not on metal bench)
Compare free-space vs. in-enclosure measurements
Bandwidth Verification
Check that S11 remains below -10 dB across the entire operating band:
WiFi: 2.400–2.483 GHz
Bluetooth: 2.400–2.483 GHz
Zigbee: 2.405–2.480 GHz
A well-designed IFA should have 200+ MHz bandwidth, providing margin for manufacturing variation.
Range Testing
Practical range testing matters more than perfect S11. Set up a controlled test:
Program two devices with known TX power
Measure maximum communication distance
Compare against expected link budget
Test in multiple orientations (antennas are directional)
Applications and Reference Designs
ESP32 / ESP8266 Projects
The ESP32 and ESP8266 use meandered IFA antennas. If you’re designing a custom board with these modules:
ESP32-WROOM: Internal antenna, no external design needed
ESP32-WROVER: Can use external antenna via U.FL
ESP8266 bare chip: Requires your own antenna design
For bare-chip designs, copy the antenna layout from Espressif’s reference designs exactly—including ground plane dimensions.
When designing custom ESP32 boards, the module placement is critical. The antenna portion of the module must extend beyond your main PCB ground plane, or you’ll severely detune the internal antenna. Many designers make the mistake of placing the ESP32 module in the center of the board with ground on all sides—this kills wireless performance.
Nordic nRF52 and nRF53 Series
Nordic Semiconductor provides excellent reference antenna designs for their BLE chips. The nRF52840 dongle uses a compact meandered monopole that fits on USB form factors.
Key Nordic antenna specifications:
Reference design: nRF52840 Dongle (PCA10059)
Antenna size: Approximately 3 × 20 mm
Ground plane: Integrated with USB connector ground
Matching: Typically includes LC network
Silicon Labs EFR32 Series
Silicon Labs EFR32 family supports both PCB antennas and external options. Their reference designs include detailed antenna layouts with verified performance data.
EFR32 antenna considerations:
Multiple reference designs available (2-layer and 4-layer)
Both IFA and MIFA options documented
Includes simulation files for customization
Bluetooth Low Energy Devices
BLE applications typically need:
Lower power consumption (smaller ground plane acceptable)
Compact form factor (MIFA preferred)
Range of 10–30 meters indoor
Zigbee / Thread / Matter
Smart home protocols need:
Reliable mesh networking
Consistent range (IFA or PIFA preferred)
Coexistence with WiFi (careful frequency planning)
WiFi IoT Sensors
For WiFi-connected sensors:
Longer range requirements (consider external antenna option)
Higher power consumption acceptable
IFA provides best balance
Useful Resources and Downloads
Reference Design Documents
Document
Source
Description
AN043
Texas Instruments
Small size 2.4 GHz IFA design (ti.com/lit/an/swra117d)
Texas Instruments, Silicon Labs, and NXP all provide downloadable Gerber files for their reference antenna designs. Import these directly into your PCB tool as a starting point.
Frequently Asked Questions
How do I calculate the exact antenna length for 2.4 GHz?
The theoretical quarter-wavelength in free space is 30.6mm (at 2.45 GHz). On FR4 substrate, the effective length reduces to approximately 15–23mm depending on trace geometry and substrate thickness. For practical designs, start with a reference design from your RF chip manufacturer and tune from there. The exact length depends on ground plane size, trace width, and nearby components—simulation or empirical testing is required for precise tuning.
Can I use a 2.4 GHz PCB antenna design on a 4-layer board?
Yes, but the stackup affects dimensions. The critical parameter is the distance between the antenna layer (usually top) and the ground reference layer. On a 4-layer board with ground on layer 2, use the same calculations as a 2-layer board with equivalent dielectric thickness. Ensure no copper exists on layers 2–4 in the antenna keep-out zone if those layers extend into that region.
Why does my antenna work well in free space but poorly in the enclosure?
Plastic enclosures increase the effective dielectric constant around the antenna, which lowers the resonant frequency. A typical plastic case shifts frequency down by 50–100 MHz. Always tune your antenna with the final enclosure in place. You may need to shorten the antenna by 1–3mm to compensate, or add series capacitance in the matching network.
What’s the minimum ground plane size for a 2.4 GHz PCB antenna?
For acceptable performance, maintain at least 20×30mm of continuous ground plane. Smaller ground planes (down to 15×25mm) can work but will have reduced efficiency and more sensitivity to nearby objects. The ground plane edge nearest the antenna is most critical—keep it at least 25mm long if possible. For USB dongle form factors, the computer’s ground becomes part of your antenna system when connected.
How do I know if my antenna needs a matching network?
Measure S11 with a VNA. If return loss is worse than -10 dB anywhere in your operating band, you need matching. Even if initial measurements look good, include footprints for a PI matching network in your design. Manufacturing variations, enclosure effects, and hand proximity can detune the antenna. Having matching component positions available lets you adjust without a board respin.
Final Thoughts
Designing a working 2.4 GHz PCB antenna isn’t magic—it’s attention to detail. The antenna trace dimensions matter, but so does the ground plane size, the feed line impedance, the keep-out zones, and the enclosure effects. Skip any of these, and you’ll spend hours wondering why your range is terrible.
My recommendation for first-time designers: don’t try to innovate. Find a reference design from TI, Silicon Labs, or NXP that matches your board size and copy it exactly—ground plane dimensions, trace widths, layer stackup, everything. Get that working first, then optimize if needed.
For production designs, always tune with your actual enclosure and include matching network footprints. The cost of three 0402 component positions is nothing compared to a board respin because your antenna doesn’t work in the final product.
PCB antenna design is part science, part art, and part empirical testing. The good news is that once you understand the fundamentals and have a working reference point, you can confidently tackle any 2.4 GHz design that comes your way.
Questions about your specific 2.4 GHz antenna design? Drop them in the comments below.
Inquire: Call 0086-755-23203480, or reach out via the form below/your sales contact to discuss our design, manufacturing, and assembly capabilities.
Quote: Email your PCB files to Sales@pcbsync.com (Preferred for large files) or submit online. We will contact you promptly. Please ensure your email is correct.
Notes: For PCB fabrication, we require PCB design file in Gerber RS-274X format (most preferred), *.PCB/DDB (Protel, inform your program version) format or *.BRD (Eagle) format. For PCB assembly, we require PCB design file in above mentioned format, drilling file and BOM. Click to download BOM template To avoid file missing, please include all files into one folder and compress it into .zip or .rar format.


