Inquire: Call 0086-755-23203480, or reach out via the form below/your sales contact to discuss our design, manufacturing, and assembly capabilities.
Quote: Email your PCB files to Sales@pcbsync.com (Preferred for large files) or submit online. We will contact you promptly. Please ensure your email is correct.
Notes: For PCB fabrication, we require PCB design file in Gerber RS-274X format (most preferred), *.PCB/DDB (Protel, inform your program version) format or *.BRD (Eagle) format. For PCB assembly, we require PCB design file in above mentioned format, drilling file and BOM. Click to download BOM template To avoid file missing, please include all files into one folder and compress it into .zip or .rar format.
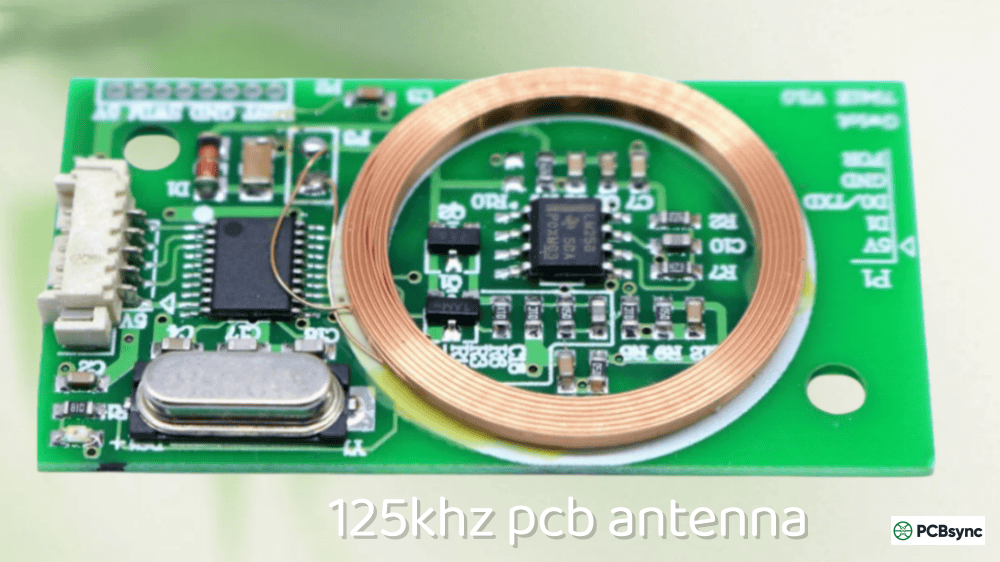
Designing a 125kHz PCB antenna confused me the first time I attempted it. I approached it like a typical RF antenna project—calculating quarter wavelengths, worrying about impedance matching, planning ground planes. None of that applied. At 125 kHz, the wavelength is approximately 2,400 meters. A quarter-wave antenna would be 600 meters long—obviously impractical for any PCB.
The reality is that a 125kHz PCB antenna isn’t an antenna in the traditional sense. It’s a magnetic coupling coil—an inductor that creates a magnetic field to power and communicate with RFID tags through near-field inductive coupling. Once I understood this fundamental difference, designing working 125kHz RFID readers became straightforward.
This guide covers everything you need to design functional 125kHz PCB antennas for RFID applications. I’ll give you inductance formulas, practical coil dimensions, tuning calculations, and layout rules that actually work. Whether you’re building an access control reader, an animal ID scanner, or an Arduino RFID project, these principles apply.
Unlike high-frequency antennas that radiate electromagnetic waves into the far field, a 125kHz PCB antenna operates entirely in the near field through magnetic induction. Think of it as one half of a transformer—the reader coil is the primary winding, and the RFID tag’s tiny coil is the secondary.
Near-Field Magnetic Coupling Explained
Parameter
Far-Field (RF Antennas)
Near-Field (125kHz)
Operating principle
Electromagnetic radiation
Magnetic induction
Energy transfer
Radiating waves
Magnetic field coupling
Range relationship
1/r² (inverse square)
1/r³ to 1/r⁶ (drops faster)
Typical range
Meters to kilometers
Centimeters to ~1 meter
Frequency
> 100 MHz typical
125 kHz (LF RFID)
When current flows through your PCB coil, it generates a magnetic field. An RFID tag entering this field has its internal coil energized through induction—no battery required. The tag then modulates this field to send data back to the reader. The entire communication happens within the magnetic near field, typically within one wavelength of the antenna.
The LC Resonant Circuit
Every 125kHz PCB antenna is fundamentally an LC (inductor-capacitor) resonant circuit. The PCB coil provides inductance (L), and you add a tuning capacitor (C) to create resonance at exactly 125 kHz.
Resonant frequency formula:
f = 1 / (2π × √(L × C))
Rearranged to find the required capacitance:
C = 1 / ((2π × f)² × L)
At resonance, the circuit exhibits maximum current flow and generates the strongest magnetic field—critical for achieving good read range.
Key Parameters for 125kHz Coil Design
Parameter
Symbol
Typical Range
Impact
Inductance
L
200 µH – 2 mH
Determines tuning capacitor value
Quality factor
Q
10 – 50
Higher Q = more range, narrower bandwidth
Coil resistance
R
1 – 50 Ω
Affects Q factor and efficiency
Number of turns
N
10 – 100
More turns = higher inductance
Coil area
A
100 – 10,000 mm²
Larger area = stronger field, more range
Inductance Calculations for PCB Coils
Calculating inductance accurately is essential for 125kHz PCB antenna design. The inductance determines your tuning capacitor value and affects the coil’s Q factor.
Square Spiral Coil Inductance Formula
For square planar spiral coils (most common PCB antenna shape), use the modified Wheeler formula:
L = 0.0002 × a × (2.303 × log₁₀(2a/b) + 0.25 + b/(3a)) × N²
Where:
L = inductance in microhenries (µH)
a = length of longer side in cm
b = width of shorter side in cm
N = number of turns
Inductance Reference Table for Square PCB Coils
These values assume 0.3mm trace width, 0.3mm spacing, on 1.6mm FR4:
Outer Dimension
Turns
Calculated Inductance
Typical Measured
30 × 30 mm
15
85 µH
75 – 95 µH
30 × 30 mm
25
210 µH
190 – 230 µH
40 × 40 mm
20
180 µH
160 – 200 µH
40 × 40 mm
30
380 µH
350 – 420 µH
50 × 50 mm
20
240 µH
220 – 270 µH
50 × 50 mm
35
650 µH
600 – 720 µH
60 × 60 mm
25
420 µH
380 – 470 µH
60 × 60 mm
40
980 µH
900 – 1100 µH
80 × 80 mm
30
720 µH
660 – 800 µH
Note: Actual inductance varies with trace width, spacing, PCB thickness, and manufacturing tolerances. Always measure your actual coil with an LCR meter before final tuning.
Effect of Trace Width and Spacing
Trace Width
Trace Spacing
Inductance Effect
Q Factor Effect
0.2 mm
0.2 mm
Higher (more turns)
Lower (higher resistance)
0.3 mm
0.3 mm
Baseline
Baseline
0.5 mm
0.3 mm
Lower
Higher
0.8 mm
0.4 mm
Lower
Higher
1.0 mm
0.5 mm
Lowest
Highest
Wider traces reduce resistance and increase Q factor, but they also reduce the number of turns that fit in a given area, lowering inductance. For most 125kHz applications, 0.3–0.5mm traces with 0.3mm spacing provide a good balance.
Tuning Capacitor Calculations
Once you know your coil’s inductance, calculate the tuning capacitor to achieve resonance at 125 kHz.
Important: At resonance, the voltage across the capacitor can be Q times the drive voltage. With Q=30 and 5V drive, capacitor voltage can reach 150V. Always use capacitors rated for adequate voltage.
PCB Layout Guidelines for 125kHz Coils
Proper PCB layout is critical for 125kHz PCB antenna performance. Poor layout leads to reduced range, difficult tuning, and unreliable tag reading.
Coil Placement Rules
Rule
Guideline
Reason
Ground plane clearance
≥ 10 mm from coil
Prevents eddy current losses
Component clearance
≥ 5 mm from coil traces
Reduces detuning
Metal objects
Keep away or use ferrite
Metal dampens field
Coil position
Board edge preferred
Minimizes interference
Via placement
No vias inside coil area
Prevents field disruption
Ground Plane Considerations
Unlike high-frequency antennas, a 125kHz PCB antenna does not need a ground plane underneath—in fact, ground plane under the coil severely reduces performance.
Scenario
Effect on 125kHz Coil
No ground under coil
Optimal performance
Ground plane 5mm below
30-50% inductance reduction
Ground plane directly under
70%+ inductance loss, unusable
Ferrite between coil and ground
Recovers most performance
Best practice: Create a ground plane cutout that extends at least 10mm beyond the coil edges on all sides.
Multi-Layer Coil Options
For higher inductance in limited space, use multi-layer coils:
Configuration
Inductance Multiplier
Notes
Single layer
1×
Standard design
Two layers, series connected
~4×
Traces align between layers
Two layers, parallel
~1× (lower resistance)
Increases Q factor
Four layers, series
~16×
Maximum inductance
When using multi-layer coils, connect layers in series with the traces wound in the same direction (both clockwise or both counter-clockwise when viewed from the same side).
Tune for maximum range using frequency counter or oscilloscope
Common 125kHz PCB Antenna Mistakes
Mistake 1: Ground Plane Under Coil
Problem: Ground copper extends under the antenna coil area. Result: Severe inductance reduction, poor range, difficult tuning. Solution: Create keepout zone for ground on ALL layers under coil.
Mistake 2: Wrong Capacitor Type
Problem: Using X7R or Y5V ceramic capacitors for tuning. Result: Capacitance varies with temperature, unreliable resonance. Solution: Use C0G/NP0 ceramics or film capacitors.
Mistake 3: Traces Too Thin
Problem: Using minimum trace width to maximize turns. Result: High resistance, low Q factor, reduced range. Solution: Balance trace width (0.3–0.5mm) with turn count.
Mistake 4: Not Measuring Actual Inductance
Problem: Relying solely on calculated inductance. Result: Tuning is off, reduced performance. Solution: Always measure with LCR meter, adjust capacitors accordingly.
Mistake 5: Metal Objects Near Coil
Problem: Mounting screws, brackets, or enclosure near antenna. Result: Field distortion, detuning, dead spots. Solution: Keep metal >20mm away, or use ferrite shielding.
Mistake 6: Ignoring Voltage Ratings
Problem: Undersized capacitor voltage rating. Result: Capacitor failure, sometimes dramatic. Solution: Use capacitors rated for at least 50V, preferably 100V.
Useful Resources for 125kHz Antenna Design
Application Notes and Datasheets
Document
Source
Content
AN710
Microchip
Antenna circuit design for RFID
AN411
EM Microelectronic
EM4095 application note
microID Design Guide (51115F)
Microchip
Complete 125kHz RFID system design
TI LF Tag Coil Design
Texas Instruments
Transponder antenna selection
Online Calculators
Tool
URL
Function
Planar Coil Calculator
translatorscafe.com
Spiral coil inductance
Coil32
coil32.net
Multiple coil geometries
Missouri S&T Calculator
emclab.mst.edu
PCB spiral inductance
Reader Modules for Prototyping
Module
Features
Typical Use
RDM6300
EM4095-based, UART output
Arduino projects
ID-12LA/ID-20LA
Integrated antenna, simple
Quick prototypes
PN532
Multi-frequency (125kHz + 13.56MHz)
Advanced projects
Frequently Asked Questions
What inductance should I target for a 125kHz PCB antenna?
For most 125kHz RFID reader ICs, target inductance between 200 µH and 1 mH. The EM4095, the most popular reader IC, works best with approximately 530 µH. Higher inductance allows smaller coils but requires smaller (and more expensive) tuning capacitors. Lower inductance needs larger capacitors but offers wider manufacturing tolerance. Always check your specific reader IC datasheet for recommended inductance range, as this varies between manufacturers.
How do I increase the read range of my 125kHz RFID reader?
Read range depends primarily on coil area, Q factor, and tuning accuracy. To maximize range: (1) Use the largest coil that fits your application—doubling coil dimensions can nearly double read range; (2) Optimize Q factor by using wider traces and high-quality C0G/NP0 capacitors; (3) Fine-tune resonance to exactly 125 kHz using a frequency counter or oscilloscope; (4) Ensure no metal objects are near the coil, or use ferrite shielding if unavoidable; (5) Increase drive current if your reader IC supports it. Realistically, most PCB-based 125kHz systems achieve 5–15 cm range with standard card-sized tags.
Can I put a ground plane under my 125kHz coil antenna?
No—ground plane directly under a 125kHz coil dramatically reduces inductance (by 50–70%) and degrades performance. The coil induces eddy currents in any nearby conductor, which oppose the magnetic field. Create a ground plane cutout extending at least 10mm beyond the coil edges. If you must place the coil near metal (such as a metal enclosure), use a ferrite sheet between the coil and metal to redirect the magnetic field and recover performance. Even with ferrite, expect some inductance change—always re-measure and re-tune after final assembly.
Why does my 125kHz reader work intermittently or have dead spots?
Intermittent reading usually indicates one of these issues: (1) Poor tuning—verify resonant frequency is exactly 125 kHz with an oscilloscope; (2) Low Q factor—check for high-resistance solder joints or damaged traces; (3) Nearby metal causing detuning—identify and remove or shield metal objects; (4) Capacitor issues—X7R/Y5V capacitors drift with temperature, replace with C0G/NP0; (5) Weak power supply—ensure stable 5V with adequate current; (6) Tag orientation—125kHz tags read best when parallel to the reader coil, poor coupling occurs at 90° angles. Dead spots often indicate metal interference or standing wave patterns in larger coil systems.
What’s the difference between 125kHz and 13.56MHz RFID antennas?
Both are inductive coupling systems, but they differ significantly in design. At 125kHz (LF RFID), wavelength is ~2400m, so PCB antennas are purely near-field magnetic coils with hundreds of µH inductance and relatively large physical size. At 13.56MHz (HF RFID/NFC), wavelength is ~22m, still near-field but with much lower inductance requirements (1–5 µH typical). HF coils are physically smaller, use fewer turns, and have tighter tuning requirements. LF systems penetrate materials better and work near metal with ferrite shielding; HF systems offer faster data transfer and are used for NFC payments and smart cards. The design principles are similar, but dimensions, inductance values, and tuning capacitors differ by orders of magnitude.
Conclusion
Designing a working 125kHz PCB antenna requires understanding that you’re building a magnetic coupling coil, not a traditional radiating antenna. The fundamentals are straightforward once you grasp this concept: calculate your inductance based on coil geometry, add a tuning capacitor for 125 kHz resonance, keep ground planes away from the coil, and optimize Q factor for your range requirements.
My recommendation for first-time designers: start with a proven reference design from your reader IC manufacturer (EM4095’s application note is excellent), build it exactly as specified, verify it works, then modify dimensions for your specific requirements. Trying to optimize everything at once leads to frustration—get a working baseline first.
The most common failure mode I see is ground plane copper under the coil. Check your Gerber files carefully before fabrication—that ground pour you forgot to exclude will cost you a board revision. Second most common: using the wrong capacitor type. Spend the extra few cents for C0G/NP0 ceramics; your production yield will thank you.
With proper design, a 125kHz PCB antenna provides reliable, low-cost RFID reading for access control, identification, and countless other applications. The physics hasn’t changed in decades, and the design principles are well-established. Follow the guidelines in this article, and your reader will work as intended.
Inquire: Call 0086-755-23203480, or reach out via the form below/your sales contact to discuss our design, manufacturing, and assembly capabilities.
Quote: Email your PCB files to Sales@pcbsync.com (Preferred for large files) or submit online. We will contact you promptly. Please ensure your email is correct.
Notes: For PCB fabrication, we require PCB design file in Gerber RS-274X format (most preferred), *.PCB/DDB (Protel, inform your program version) format or *.BRD (Eagle) format. For PCB assembly, we require PCB design file in above mentioned format, drilling file and BOM. Click to download BOM template To avoid file missing, please include all files into one folder and compress it into .zip or .rar format.


